User Guide
- 1. Introduction
- 2. Quick start
- 3. Overview of Features
- 4. Features
- 5. Command Summary
- 6. Glossary
- 7. FAQ
1. Introduction
1.1 About Fine$$e
Welcome to Fine$$e - your personal finance tracker!
Looking for an all-in-one solution to help you develop good financial habits? Look no further!
Fine\$\$e is an integrated platform fully customized for tertiary (including university) students with the aim of helping you to track your finances effectively. Fine\$\$e allows you to keep track of your incomes, expenses and savings with a few simple commands. Furthermore, to help you cultivate good financial habits, Fine$$e allows you to budget your finances by setting an expense limit and savings goal, as well as viewing your past spending and saving trends.
Commands can be input easily via the Command Line Interface (CLI), and the information you provide Fine$$e with will be displayed on our sleek Graphical User Interface (GUI).
If you wish to better manage your finances while cultivating good financial habits, then Fine$$e is definitely the application for you!
Explore our User Guide to find out more about Fine$$e’s amazing features.
1.2 Navigating the User Guide
The aim of the User Guide is to provide you with all the necessary information required for you to fully utilize Fine$$e. We have ensured that the information provided is concise, accessible and easily readable.
Head to Section 2. “Quick Start” for help on setting up.
Section 3. “Overview of Features” provides a brief overview of Fine$$e’s myriad of features, while Section 4. “Features” contains an in-depth breakdown of all the features that Fine$$e has to offer.
If you have forgotten the input format for a particular command, fret not as Section 5. “Command Summary” contains a list of all Fine$$e’s command input formats.
A list of the terms used in this user guide as well as their definitions is available in Section 6. Glossary.
If you have any questions regarding Fine$$e, do check out Section 7. FAQ.
Do take note of the following symbols and formatting used throughout this document:
Code in code blocks are for user input, Fine$$e data values, or file names.
This is used to indicate useful tips and tricks.
This indicates useful information.
This indicates important information.
2. Quick start
This section contains a step-by-step guide on how to install Fine\$\$e and get it to work on your computer. It also shows the various components that make up Fine\$\$e’s user interface.
Let’s get started!
2.1 Installation
-
Ensure you have Java 11 or above installed in your computer.
-
Download the latest version of
finesse.jarfrom here. -
Copy the file to the folder you want to use as the home folder for Fine$$e.
-
Double-click the file to start the app. The Fine$$e GUI should appear in a few seconds, with sample data included, similar to the below image.
-
Type a command in the command box and press Enter to execute it.
e.g. typinghelpand pressing Enter will bring up this user guide in the finance tracker.
Some example commands you can try:-
list: Lists all transactions in the current list. -
add-expense t/Bubble Tea a/5 d/03/10/2020 c/Food & Beverage: Adds an expense with the titleBubble Tea, amount$5.00, date03/10/2020and categoryFood & Beverageto the finance tracker. The UI switches to the Expenses tab. -
tab 3: Switches to the Expenses tab. -
delete 3: Deletes the 3rd transaction shown in the current list. Note that this command only works in the Expenses tab and the Incomes tab. -
exit: Exits the app.
-
-
Once you are comfortable with the various features in Fine\$\$e, clear the sample data by typing
clear, pressing Enter, typingclearagain, and pressing Enter again. -
Start tracking your own finances with Fine\$\$e!
2.2 Layout of Fine$$e’s Interface
The user interface of Fine$$e is divided into 4 tabs, each serving a specific purpose.
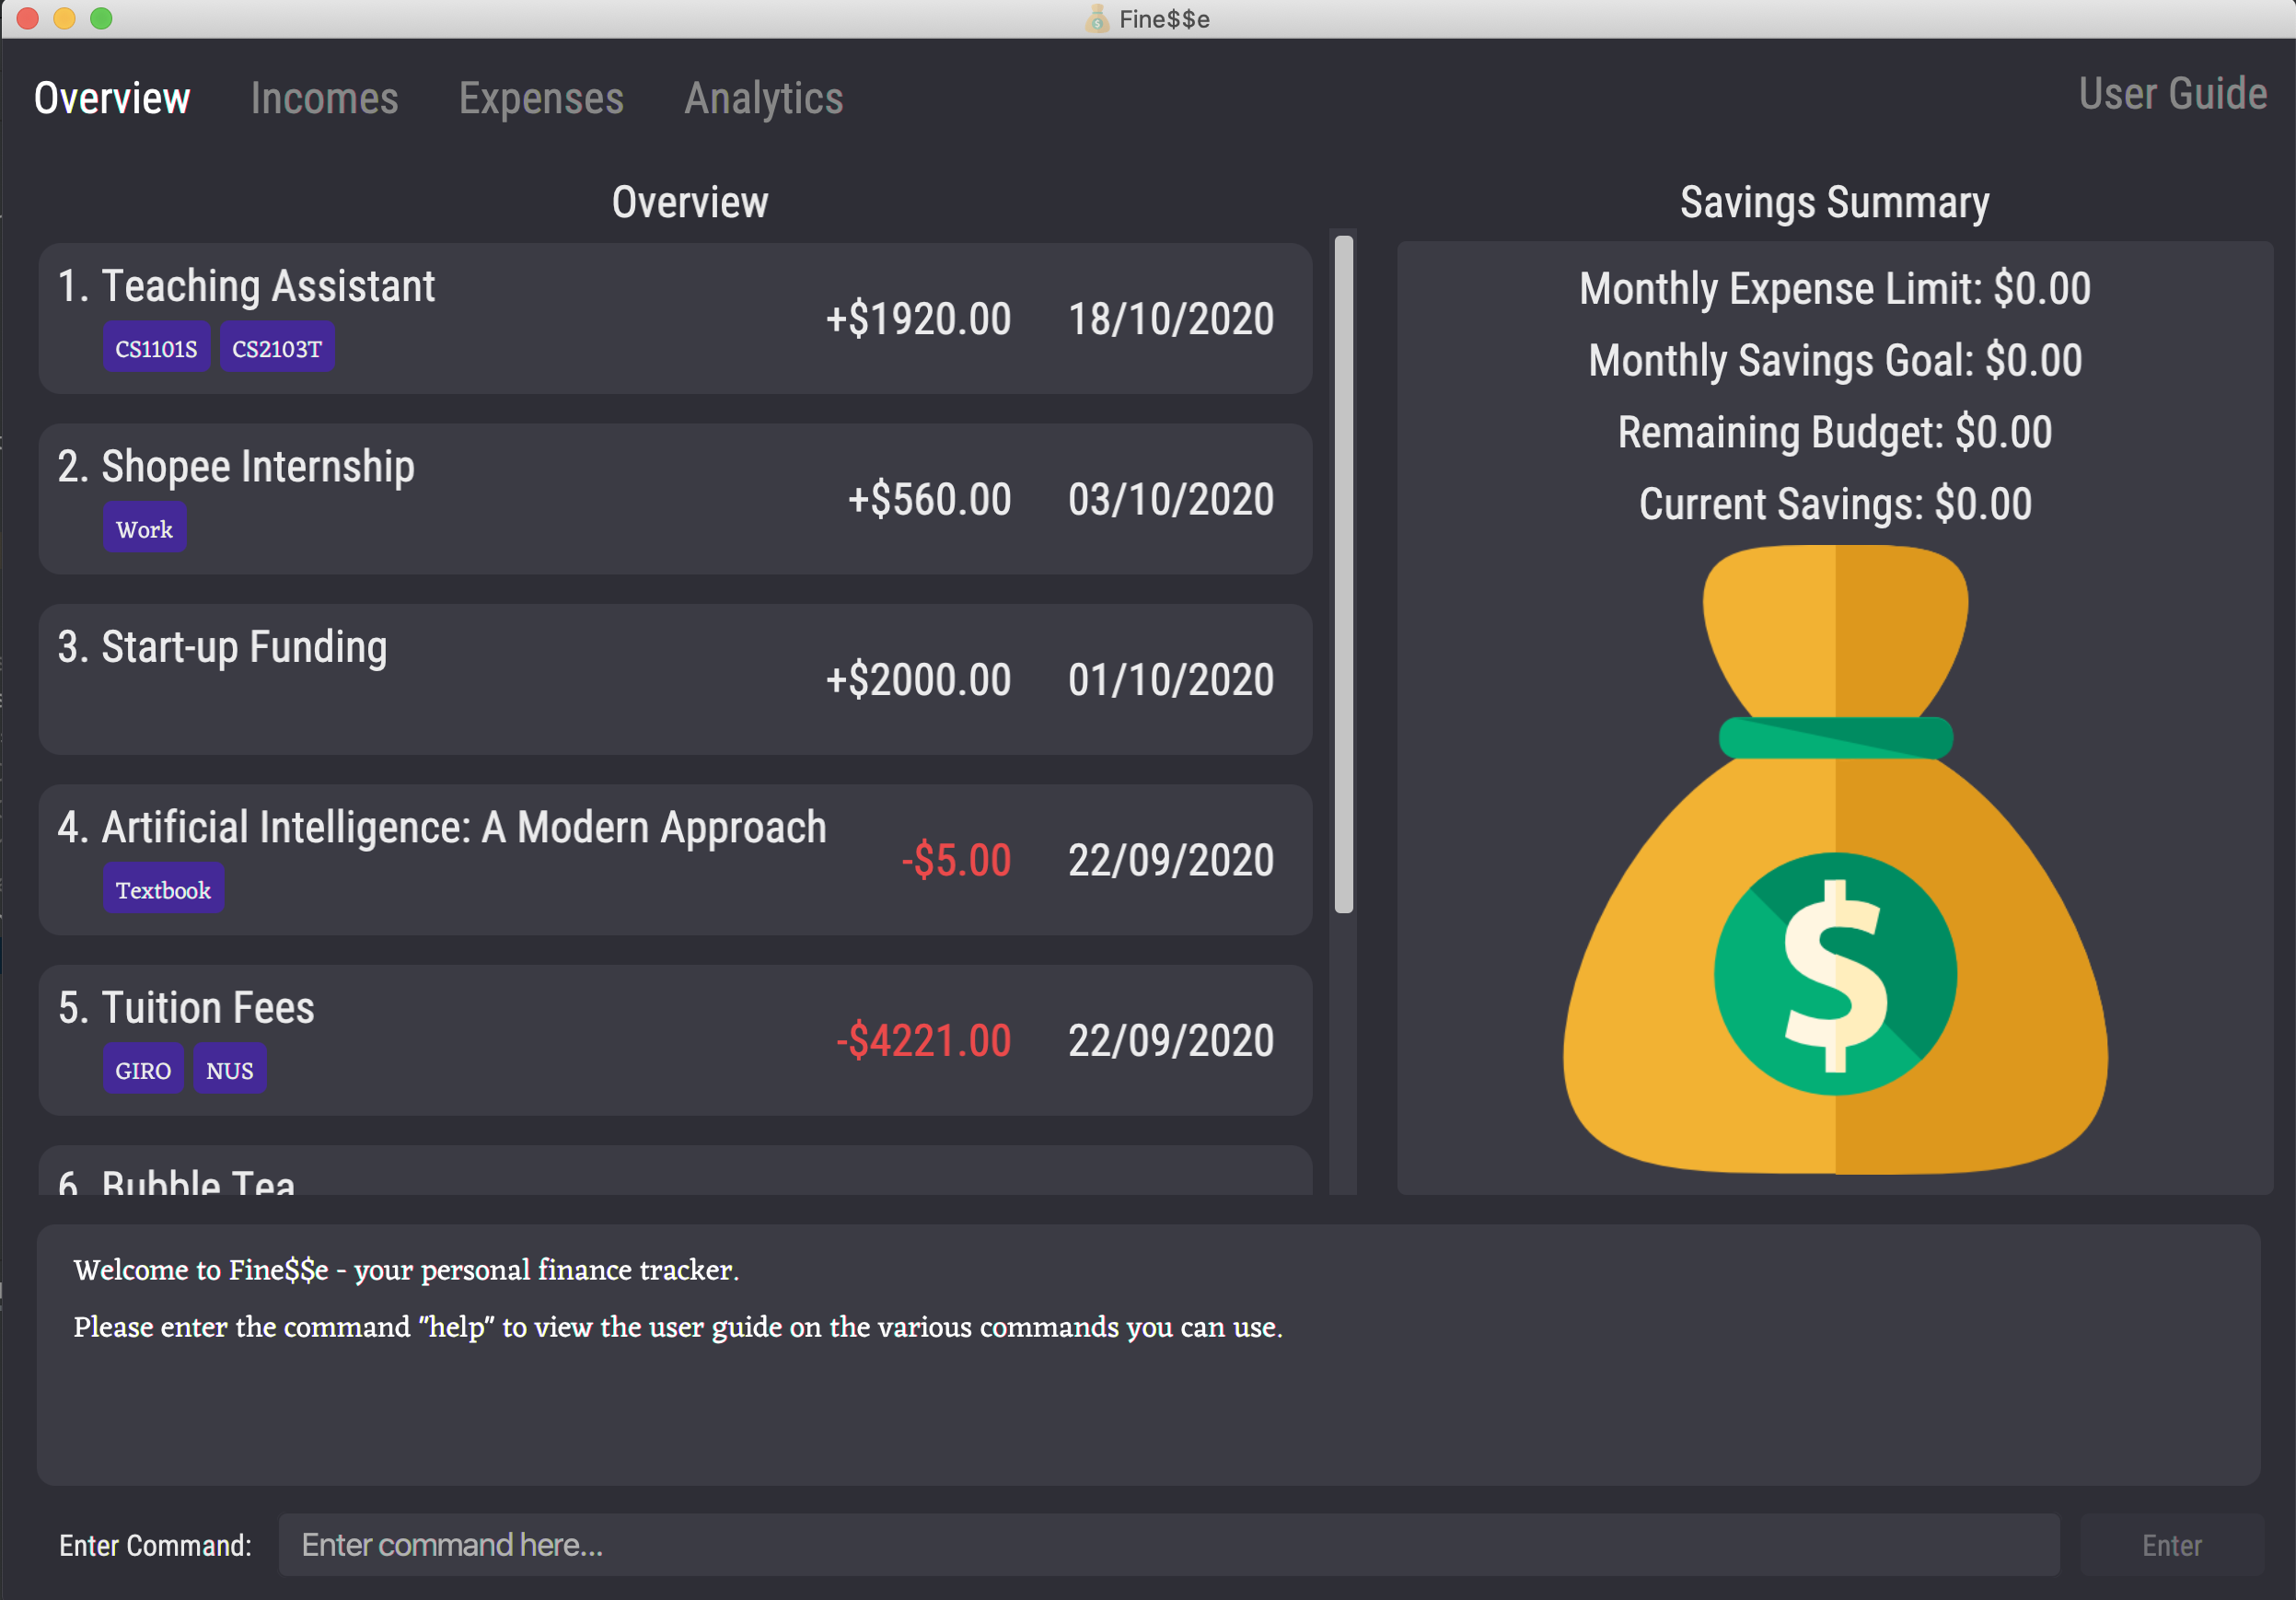
2.2.1 Overview Tab
Displays a list of all recent transactions (both incomes and expenses), along with your expense limit, savings goal, remaining budget and current savings.
Transaction amounts are prepended with either
+or-so as to distinguish between incomes and expenses respectively. In the case of the latter, the amount is also highlighted in red. This applies only to the Overview tab.

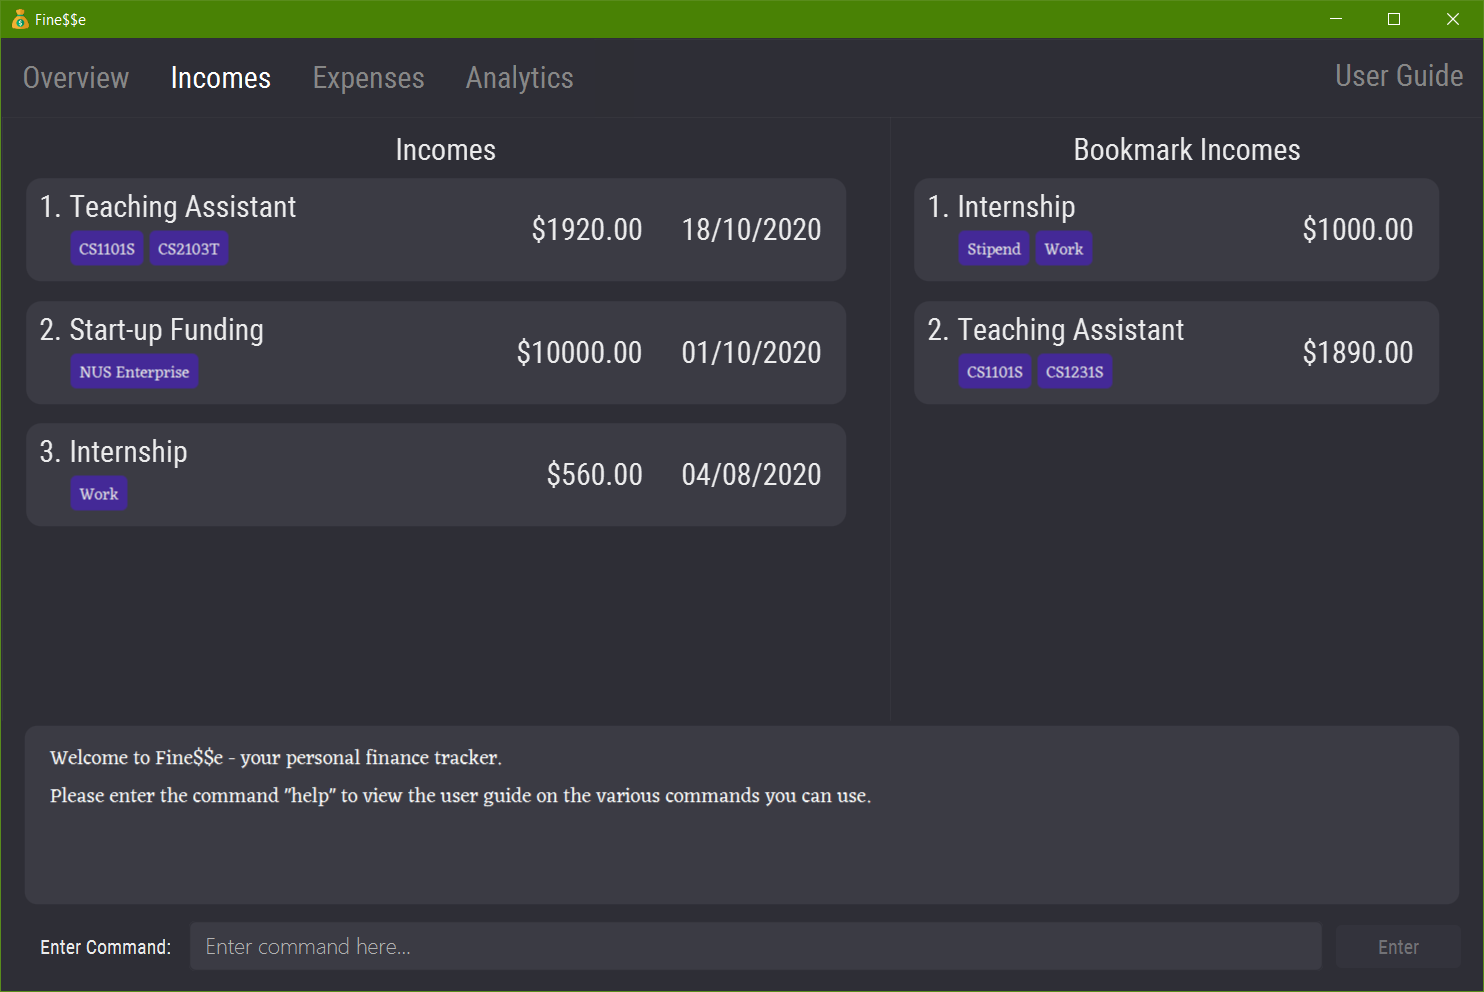
2.2.2 Incomes Tab
Displays a list of incomes and bookmark incomes.
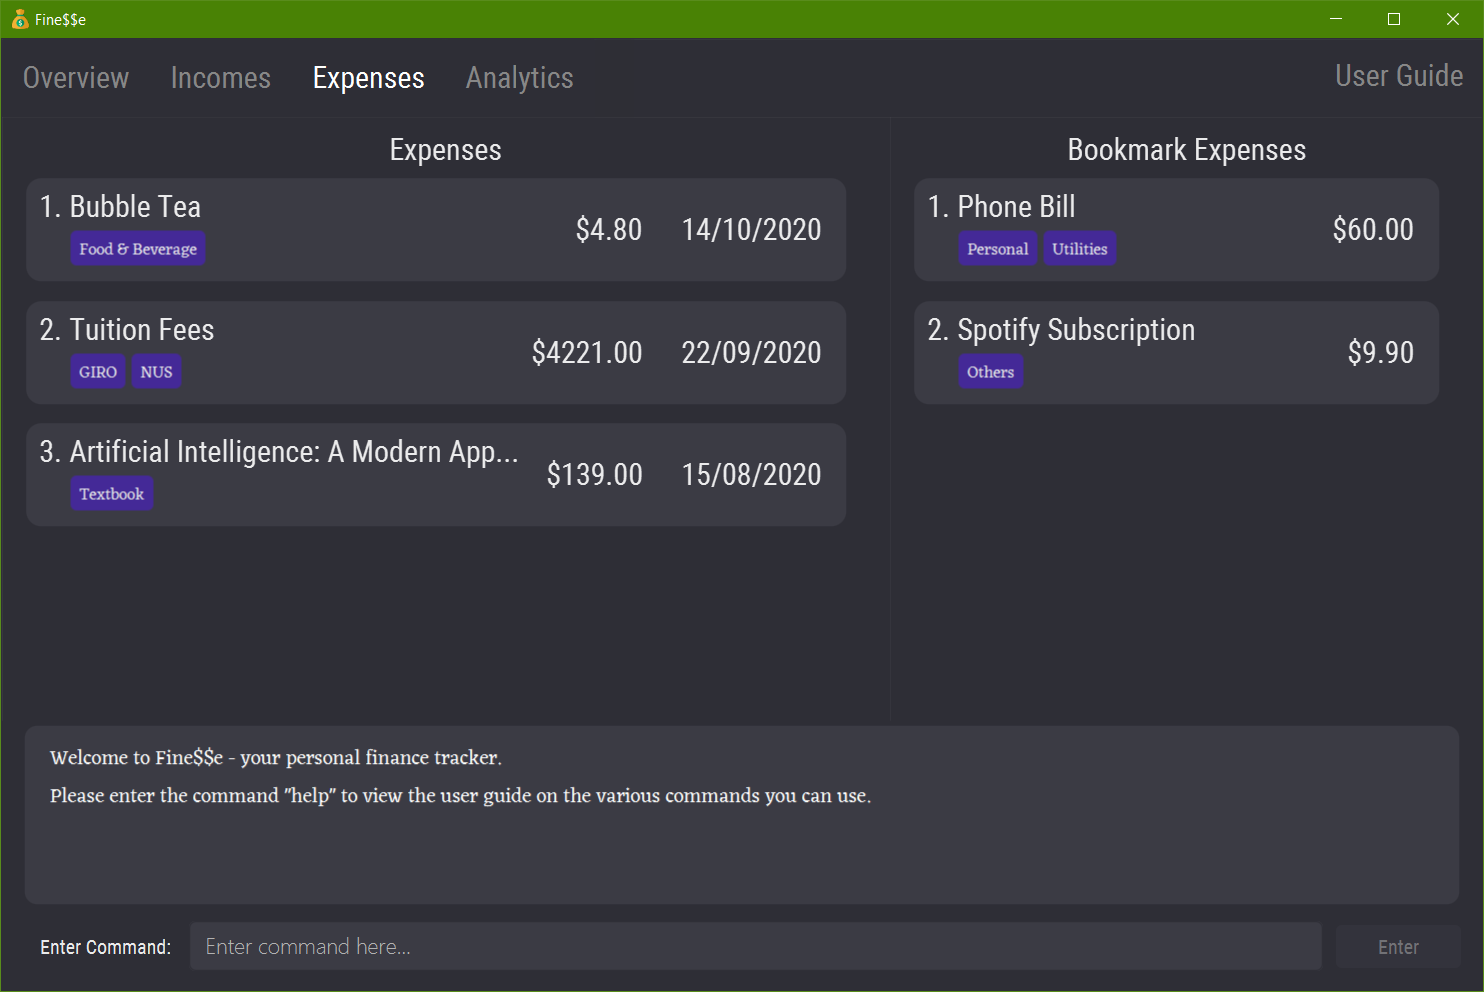
2.2.3 Expenses Tab
Displays a list of expenses and bookmark expenses.
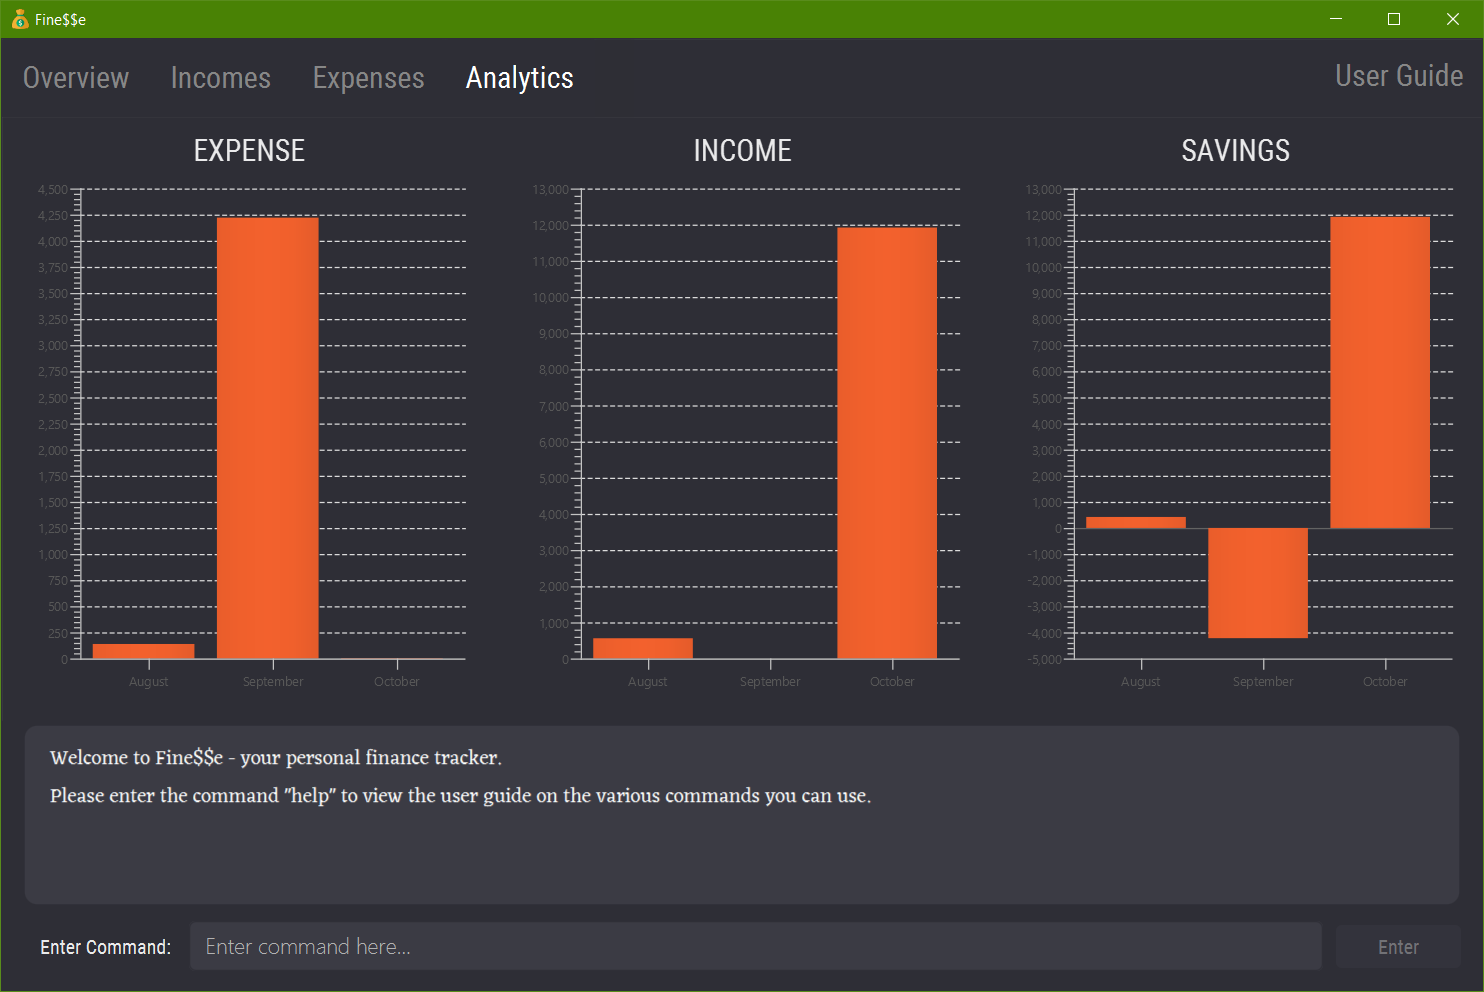
2.2.4 Analytics Tab
Displays chart visualizations of your monthly expenses, incomes and savings.
3. Overview of Features
This section will provide you with a brief overview of Fine\$\$e, so that you may get a better sense of Fine\$\$e’s basic functionalities before diving into its specific commands.
- Manage your incomes and expenses easily
- Track incomes/expenses by entering their details e.g title, amount, date
- Categorize your incomes and expenses to better organize your finances
- Search for incomes/expenses easily by keywords
- Add bookmark transactions
- Create templates for transactions that occur regularly so that frequent expenses/incomes can be added to the finance tracker more conveniently
- Budgeting
- Set a monthly expense limit to track your remaining budget for the month
- Set a monthly savings goal to help you cultivate good saving habits
- Analytics
- View trends in your finances to analyze your spending and saving habits and better plan for the future
4. Features
This section aims to provide you with in-depth details of Fine$$e’s unique features, with relevant examples.
Notes about the command format:
-
Words in
UPPER_CASEare the parameters to be supplied by the user.
e.g. inadd-expense t/TITLE,TITLEis a parameter which can be used asadd t/Bubble Tea. -
Items in square brackets (
[]) are optional.
e.gt/TITLE [c/CATEGORY]can be used ast/Bubble Tea c/Food & Beverageor ast/Bubble Tea. -
Items in square brackets, with
...after the parameter, can be used multiple times (including zero times).
e.g.[c/CATEGORY...]can be used asc/Food & Beverage,c/Food & Beverage c/Teaetc, or even omitted completely. -
Parameters can be in any order.
e.g. if the command specifiest/TITLE a/AMOUNT,a/AMOUNT t/TITLEis also acceptable. -
Any leading/trailing whitespaces for the parameters or the user input as a whole will be ignored.
e.g.find t/Bubble Tea,find t/ Bubble Teaandfind t/Bubble Teawill be treated asfind t/Bubble Tea.
IMPORTANT
The formats of the parameters used in the rest of the document are as follows:
-
TITLE,TITLE_KEYPHRASEandCATEGORYshould consist of printable ASCII characters.- The set of printable ASCII characters consists of alphanumeric characters, space, and several special characters.
Below is an exhaustive list of printable ASCII characters (excluding line breaks):
0123456789ABCDEFGHIJKLMNOPQRSTUVWXYZabcdefghijkl
mnopqrstuvwxyz !"#$%&'()*+,-./:;<=>?@[\]^_`{|}~
- The set of printable ASCII characters consists of alphanumeric characters, space, and several special characters.
Below is an exhaustive list of printable ASCII characters (excluding line breaks):
-
AMOUNT,AMOUNT_FROMandAMOUNT_TOshould each be a non-negative number with up to 8 digits before the decimal point and with 0 or 2 decimal places. An optional$may be included in front as well. -
DATE,DATE_FROMandDATE_TOshould each be a valid calendar date indd/mm/yyyyformat, representing day, month, and year respectively.- Valid ranges for days and months are governed by the rules of the Gregorian Calendar.
- Months should only range from 1 to 12 (inclusive), representing the 12 months in a year.
- Days should only range from 1 to 28, 29, 30, or 31 (all inclusive), depending on the number of days in the given month and whether the given year is a leap year.
- For day and month values, single-digit values must be padded with leading zeroes, meaning that a value of 5 should be written as
05instead of5. - For year values, it must be written in the standard 4-digit format, so 2019 should be written as
2019and not just19. - Dates cannot be earlier than 1 January 1970 (
01/01/1970). - Dates cannot be later than the current date.
- Valid ranges for days and months are governed by the rules of the Gregorian Calendar.
-
INDEXshould be a positive integer.
Unless stated otherwise, only one input per parameter is allowed for each command.
Furthermore, within each command, any other parameters other than the ones listed in each command format are considered invalid. The command will not be executed, and an error message will be displayed, if any invalid parameters are present.
4.1 View Help: help
Brings up the user guide.
Format: help
Example Usage:
help
Expected Outcome:
Opened help window.
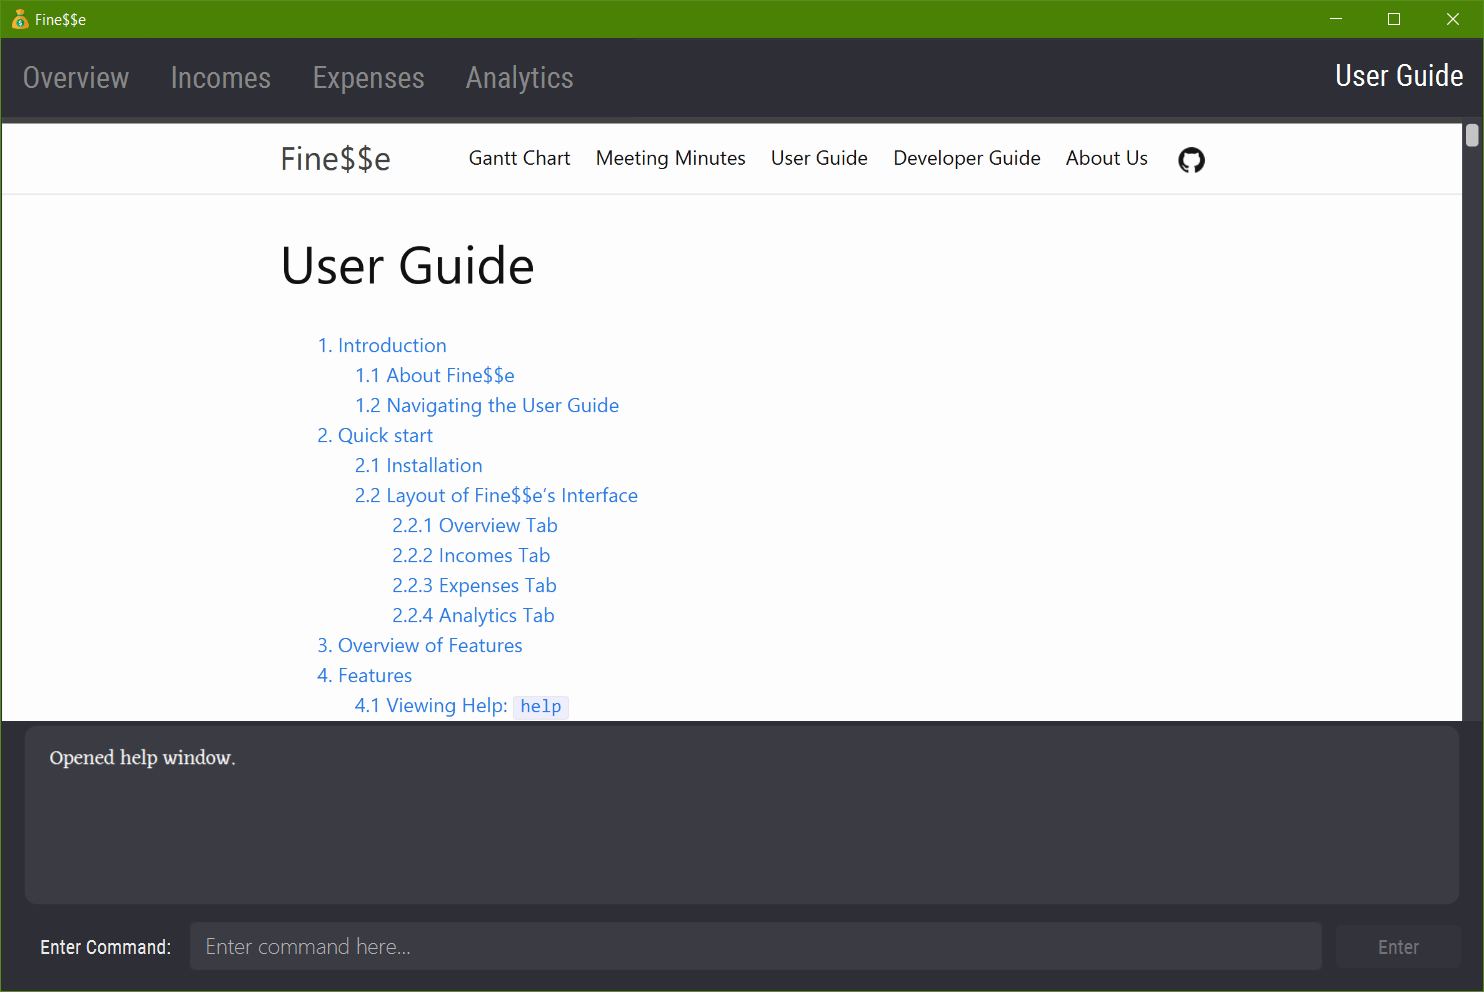
The user guide is shown in the application.
4.2 Switch Tabs: tab
Switches the current tab on Fine$$e.
Format: tab INDEX
- Switches to the tab corresponding to the specified
INDEX. For thetabcommand,INDEXmust be 1, 2, 3 or 4.- Index 1 switches to the Overview tab.
- Index 2 switches to the Incomes tab.
- Index 3 switches to the Expenses tab.
- Index 4 switches to the Analytics tab.
Example:
tab 3
Example Usage:
tab 1
Expected Outcome:
Switched to overview tab.
The application switches to the Overview tab.
4.3 Expense
An expense represents you paying money for something. It could be textbooks for the new semester, that cup of bubble tea you drank the other day, or even taking public transport.
To help you manage your finances, Fine$$e records the following information about each of your expenses:
- Title: A descriptive title, to remind you what the expense was about.
- Amount: How much money you paid, to calculate how much you have spent in total.
- Date: The date the payment took place, to track your spending over periods of time.
- Categories: Any number of categories, to help you group related expenses together.
4.3.1 Add Expense: add-expense
Adds an expense to the finance tracker.
After executing this command, the UI will automatically switch to the Expenses tab.
Format: add-expense t/TITLE a/AMOUNT [d/DATE] [c/CATEGORY...]
-
DATEis optional; ifDATEis not given, the current date is used. -
CATEGORYis optional. Multiplec/prefixes can be used to specify multiple categories.
Shortcuts: adde; (when on the Expenses tab) add
Examples:
add-expense t/Starbucks Coffee a/8.90 d/25/10/2020adde t/Taxi Home from School a/$13 c/Transport c/School
Example Usage:
add-expense t/Bubble Tea a/5 d/03/10/2020 c/Food & Beverage
Expected Outcome:
New expense added: Bubble Tea Amount: $5.00 Date: 03/10/2020 Categories: [Food & Beverage]
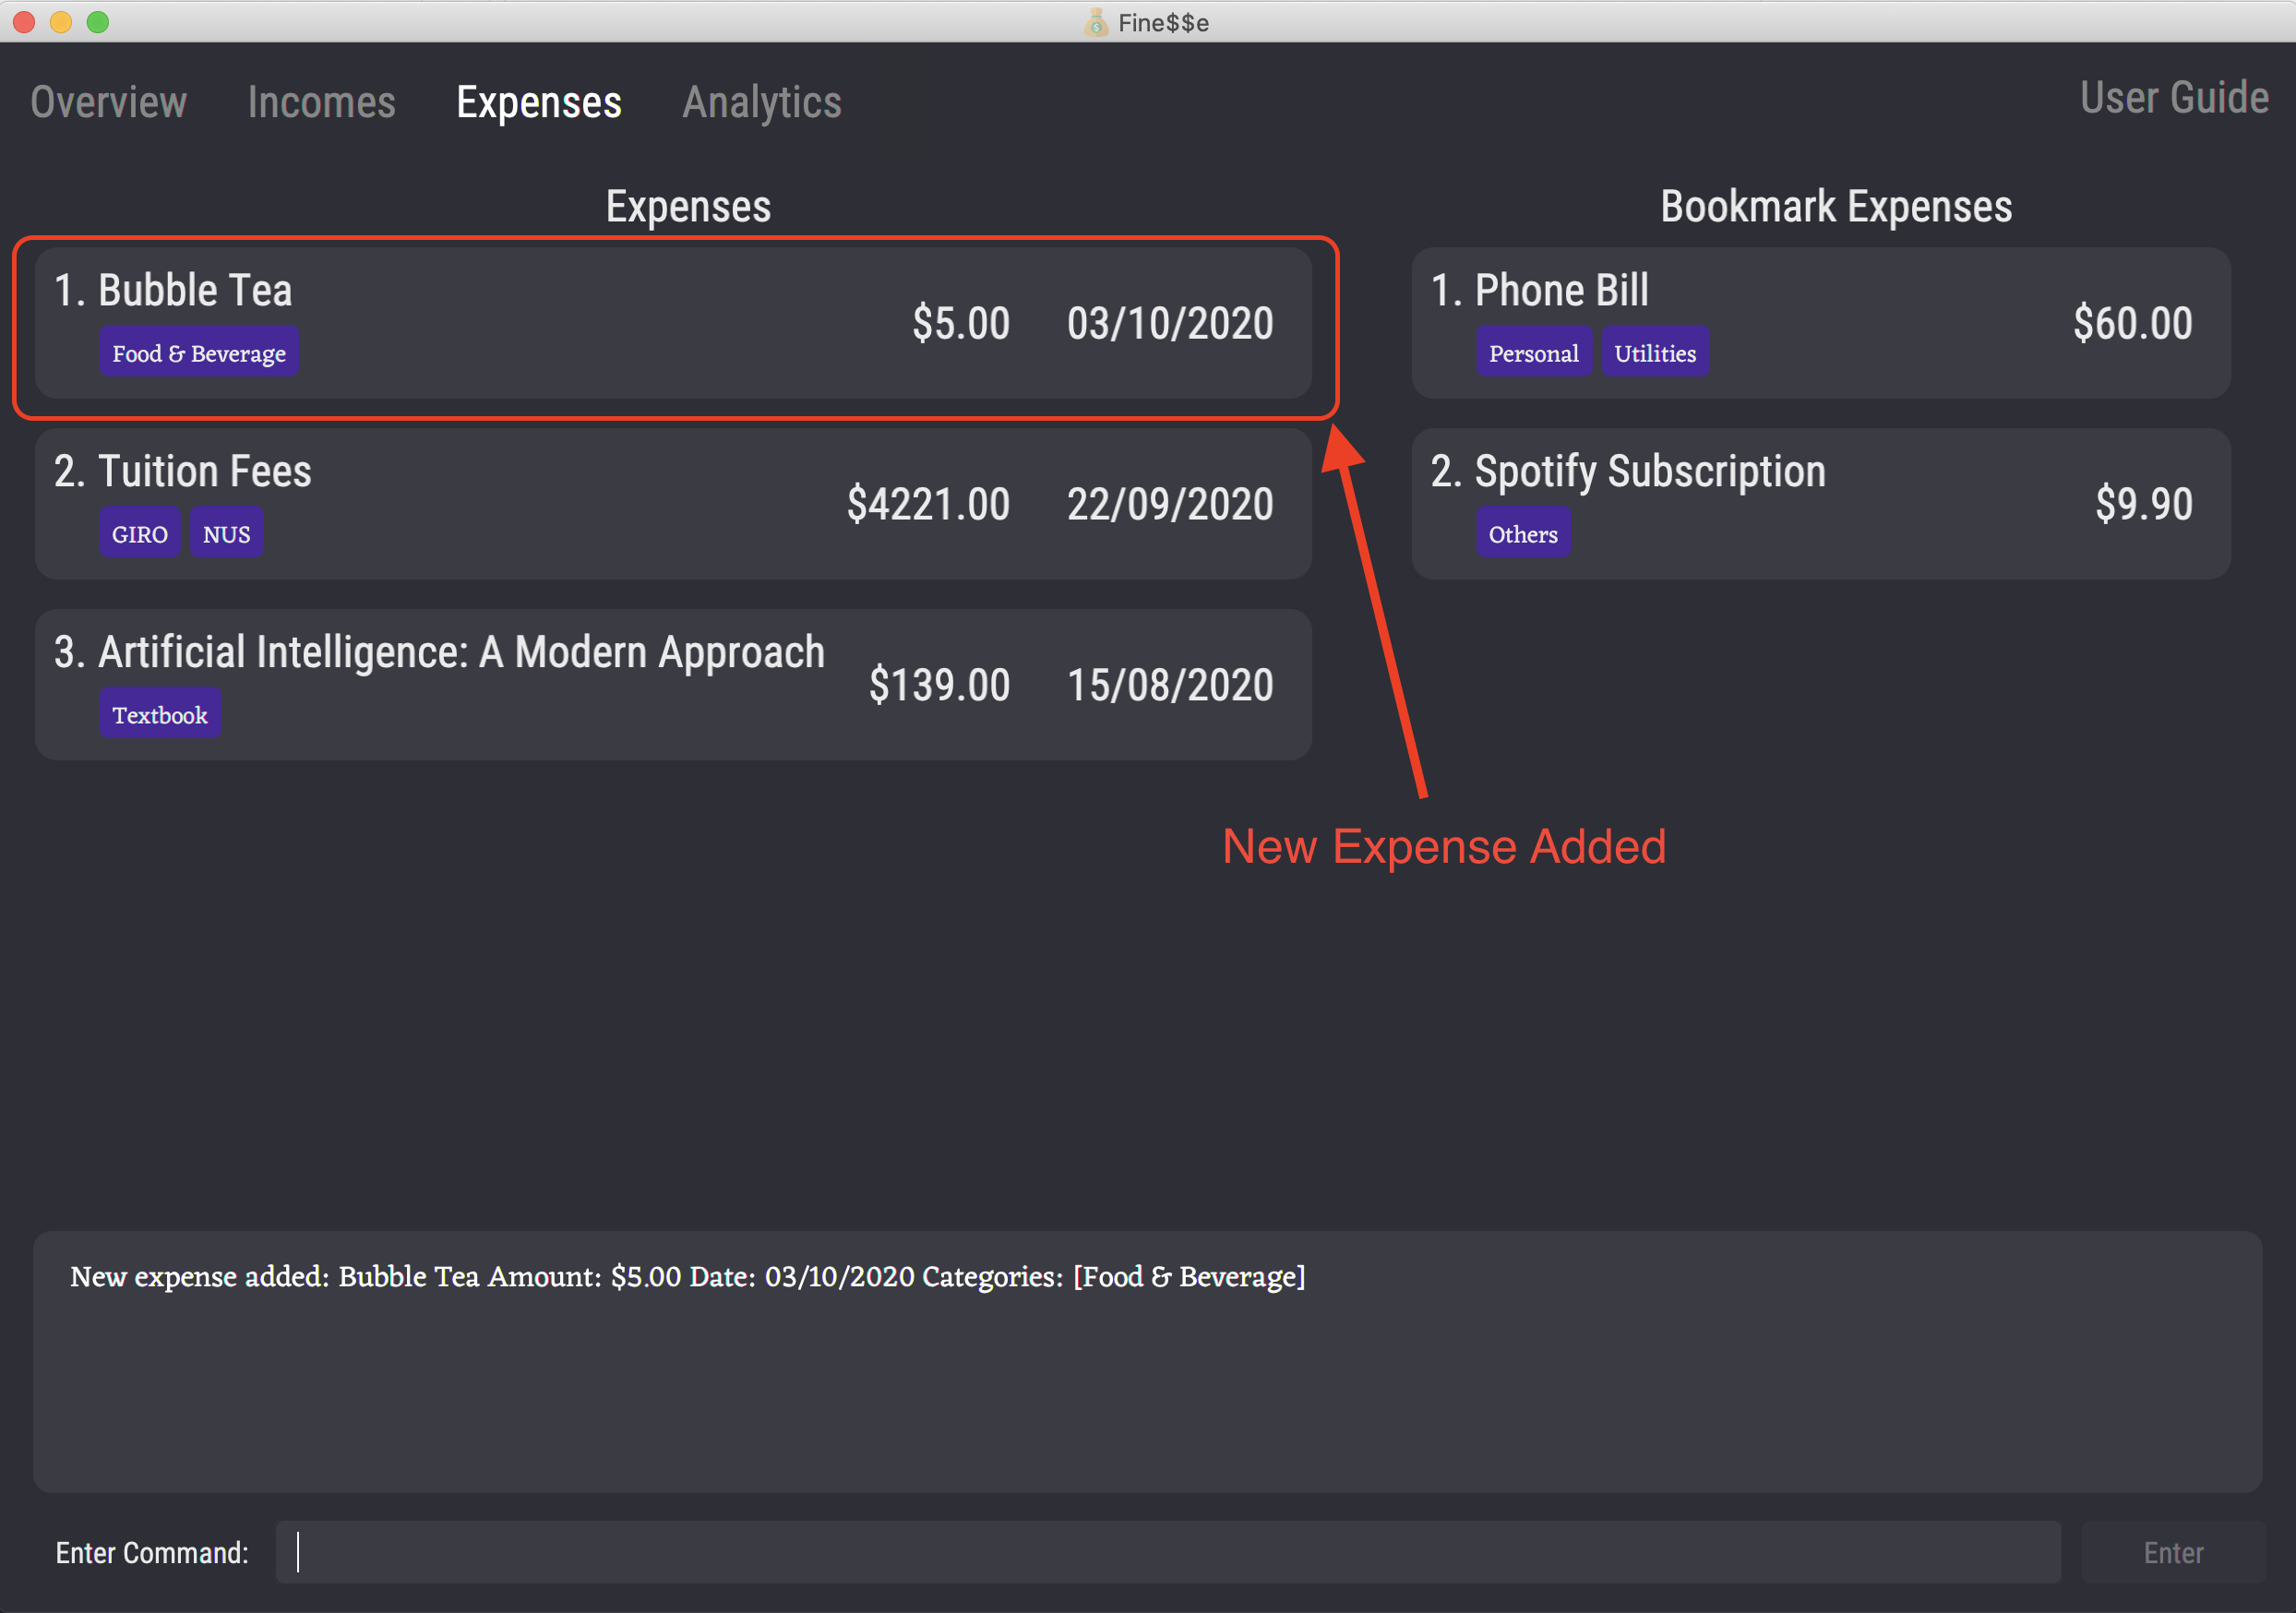
Adds a new expense titled Bubble Tea, with amount $5.00, date 03/10/2020, and a single category Food & Beverage.
4.3.2 Edit Expense: edit
Edits an expense in the finance tracker.
Format: (when on the Expenses tab) edit INDEX [t/TITLE] [a/AMOUNT] [d/DATE] [c/CATEGORY...]
-
INDEXallows you to choose which expense to edit by specifying its position in the currently displayed expenses list. -
TITLE,AMOUNT,DATEandCATEGORYallow you to specify the expense information to update.
None of them are mandatory, but at least one must be specified.
If anyCATEGORYis specified, it will replace all of the expense’s categories.
For parameters that have been omitted, the value will remain unchanged.
To remove all categories from an expense, simply use
c/with no category name following it.
Examples:
edit 1 t/Shopee Internship d/24/10/2020edit 3 a/$2000 c/
Example Usage:
edit 2 a/5 d/22/09/2020
Expected Outcome:
Edited Expense: Artificial Intelligence: A Modern Approach Amount: $5.00 Date: 22/09/2020 Categories: [Textbook]
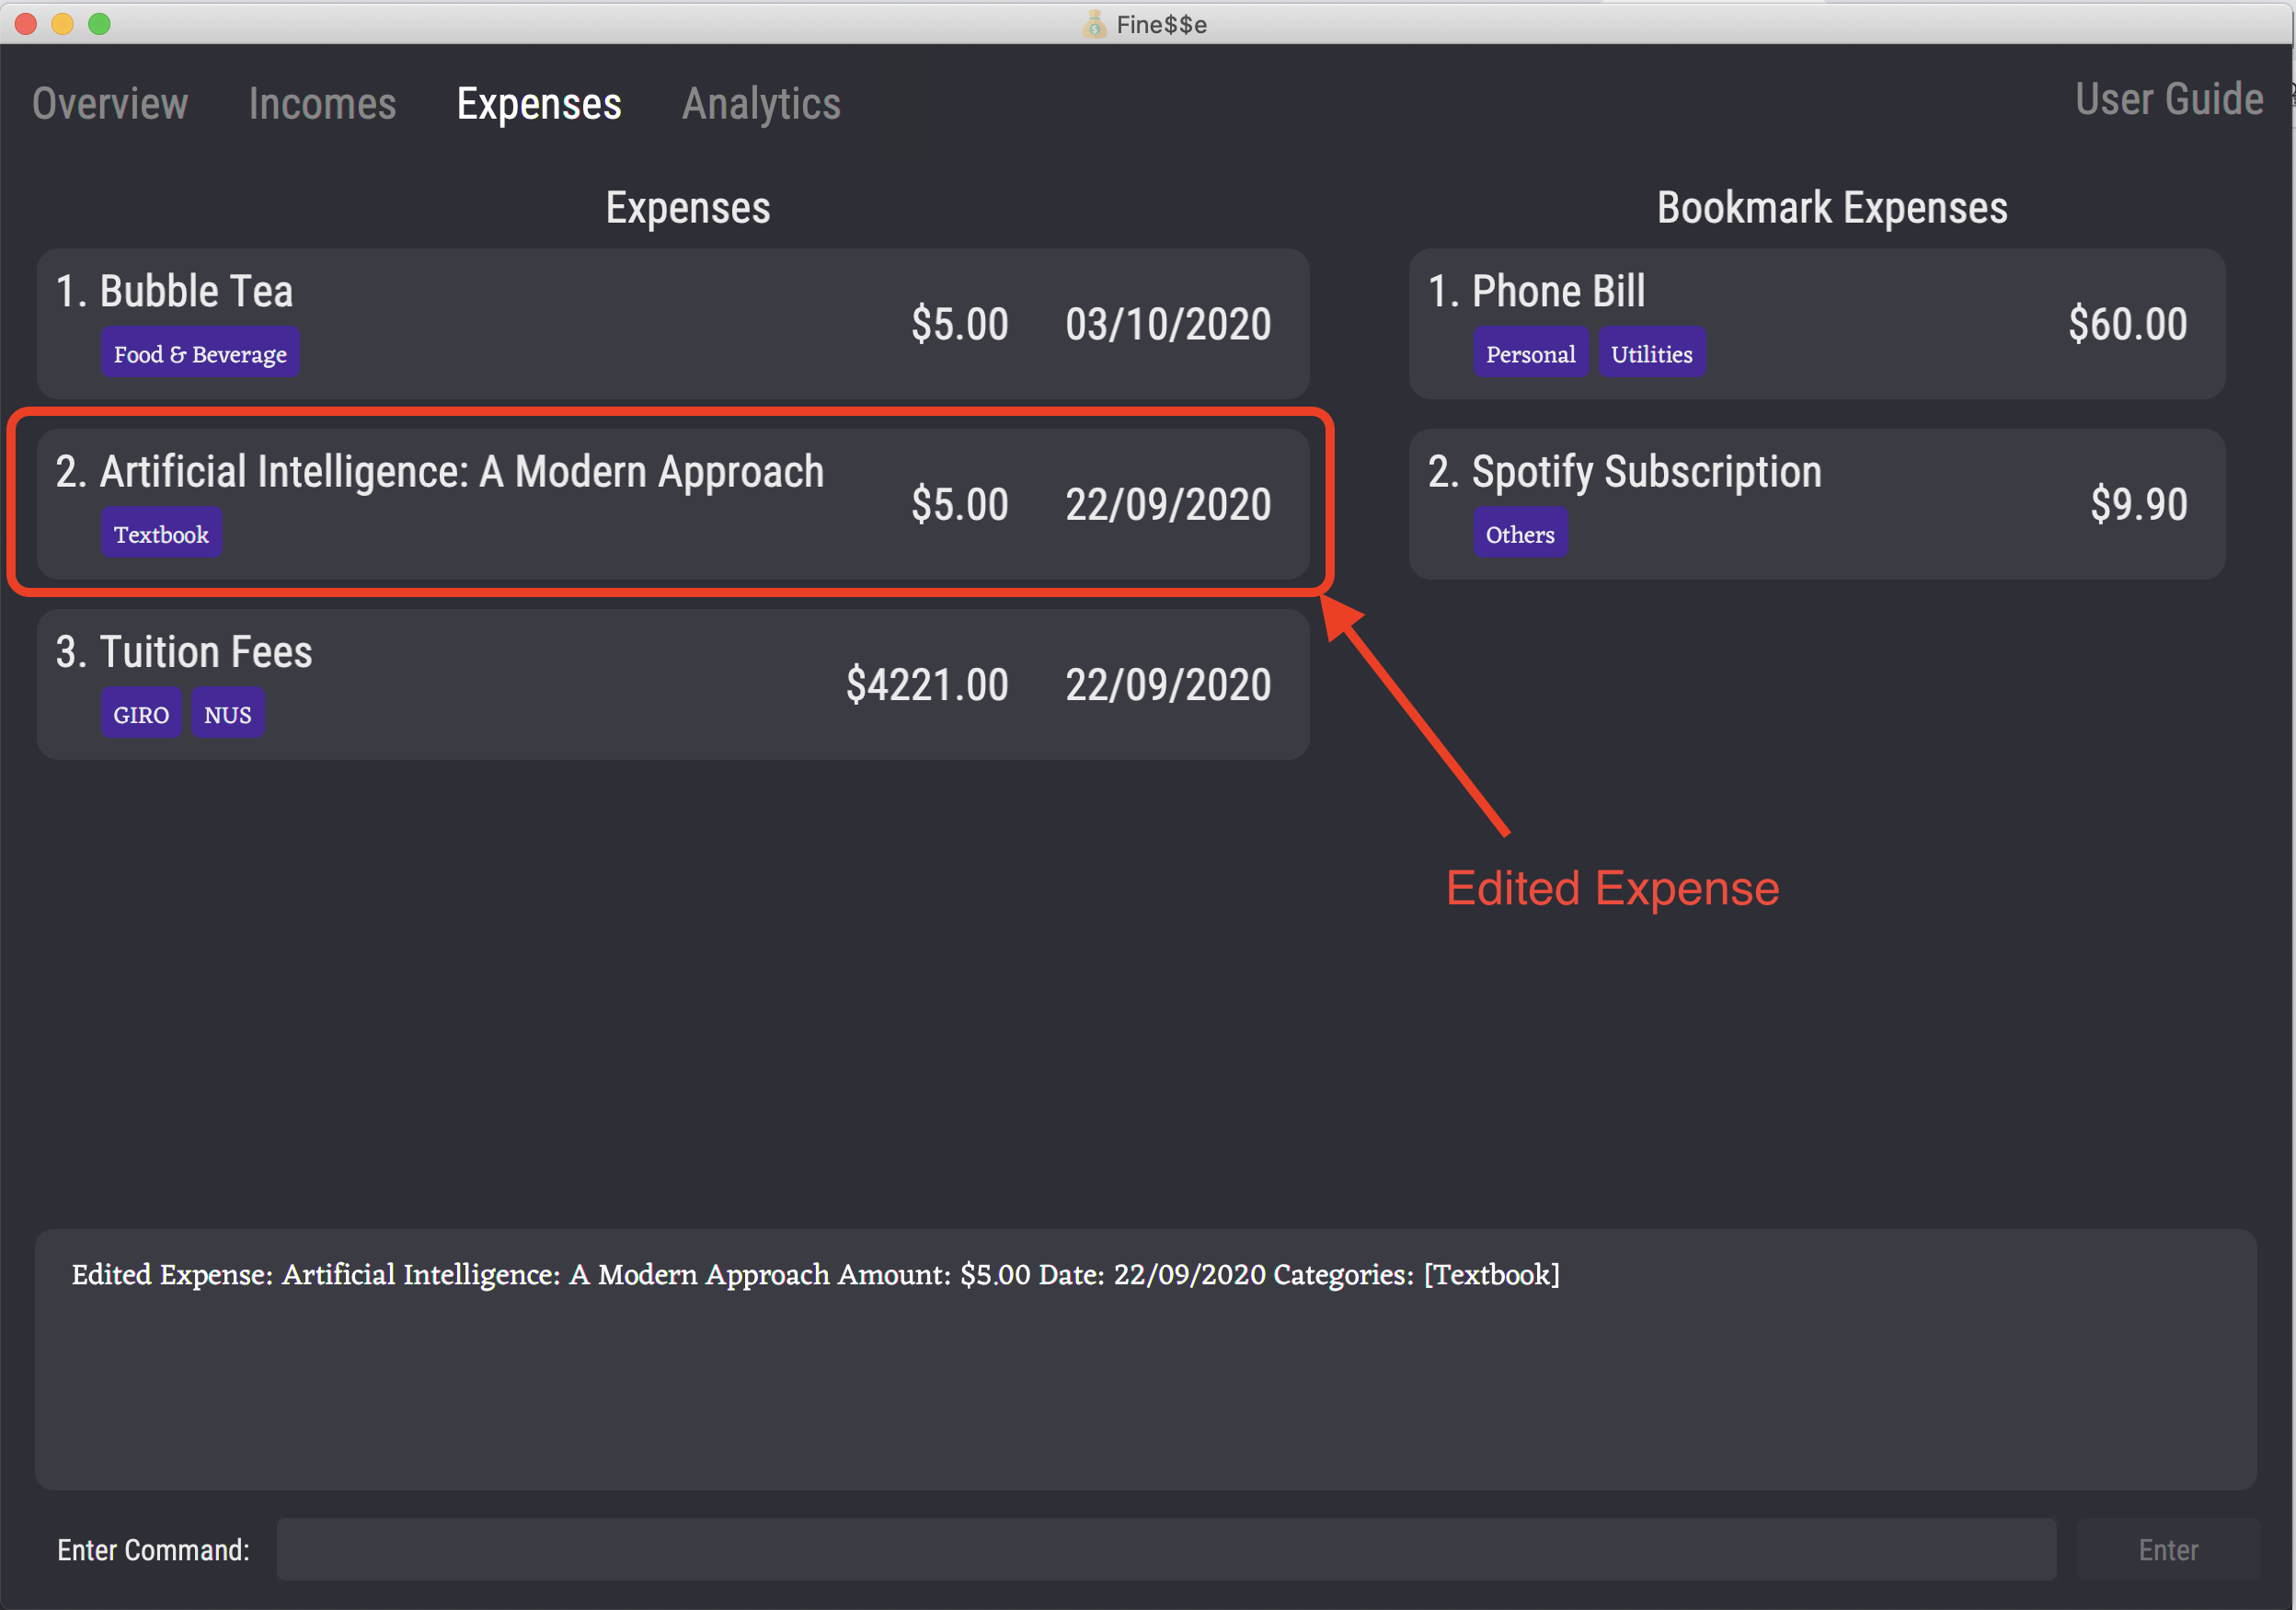
Edits the second expense in the currently displayed expenses list to have amount $5.00 and date 22/09/2020.
The rest of the expense information remains unchanged.
After executing this command, any filtering done on the expenses list via the
findcommand will be reset, and the expenses list will display all expenses.
4.3.3 Delete Expense: delete
Deletes the specified expense from the finance tracker.
Format: (when on the Expenses tab) delete INDEX
-
INDEXallows you to choose which expense to delete by specifying its position in the currently displayed expenses list.
Example:
delete 3
Example Usage:
delete 1
Expected Outcome:
Deleted Expense: Bubble Tea Amount: $5.00 Date: 22/09/2020 Categories: [Food & Beverage]
Deletes the first expense in the currently displayed expenses list.
4.3.4 List Expense: ls-expense
Shows a list of all expenses in the finance tracker.
This effectively resets any current filtering of the expenses list, such as those made by find.
After executing this command, the UI will automatically switch to the Expenses tab.
Format: ls-expense
Shortcuts: lse; (when on the Expenses tab) list
When on the Overview tab, you can use
listto list all transactions.
Example Usage:
list
Expected Outcome:
Listed all expenses.
Lists all expenses in the finance tracker.
4.3.5 Find Expense: find
Finds expenses that match any of the given search parameters, and displays the list of matching expenses.
Format: (when on the Expenses tab) find [t/TITLE_KEYPHRASE...] [a/AMOUNT] [d/DATE] [c/CATEGORY...] [af/AMOUNT_FROM] [at/AMOUNT_TO] [df/DATE_FROM] [dt/DATE_TO]
When on the Overview tab, you can use
findto search for all transactions (expenses and incomes).
The available search parameters and their uses are as follows:
-
t/TITLE_KEYPHRASE: Searches for all expenses with titles containing the specifiedTITLE_KEYPHRASEkeyphrase.- The search is case-insensitive. e.g
t/taxiwill matchTaxi. - A keyphrase can contain more than one word. e.g.
t/bubble teais considered as one keyphrase. - The order of the keyphrases does not matter. e.g.
t/Bus t/Trainwill matchTrain Bus. - Partial matches are accepted. e.g.
t/Snackwill matchSnacks. - Titles matching at least one keyphrase will be returned (i.e.
ORsearch). e.g.t/Tea t/Coffeewill returnBubble Tea,Starbucks Coffee.
- The search is case-insensitive. e.g
-
a/AMOUNT: Searches for all expenses with the specified amount. -
d/DATE: Searches for all expenses that occurred on the specified date. -
c/CATEGORY: Searches for all expenses labelled with the specified category.- The search is case-insensitive. e.g
taxiwill matchTaxi. - More than one category can be given; the search will return expenses with any of the input categories.
- The search is case-insensitive. e.g
-
af/AMOUNT_FROM: Searches for all expenses with amounts more than or equal to the specified amount. -
at/AMOUNT_TO: Searches for all expenses with amounts less than or equal to the specified amount. -
df/DATE_FROM: Searches for all expenses that occurred on or later than the specified date. -
dt/DATE_TO: Searches for all expenses that occurred on or before the specified date.
None of the search parameters are mandatory, but at least one must be specified.
Examples:
find t/tea d/22/09/2000find c/Food & drink af/10
Example Usage:
find t/tea t/coffee a/5 df/01/09/2020 dt/30/09/2020
Expected Outcome:
2 transactions listed!
Lists all expenses with titles containing tea and/or coffee, with amount equal to $5.00, in September 2020.
4.4 Income
An income represents you receiving money for something. It could be your internship allowance, prize money you won from a pitch competition, or even red packets that you received over Chinese New Year.
To help you manage your finances, Fine$$e records the following information about each of your incomes:
- Title: A descriptive title, to remind you what the income was about.
- Amount: How much money you received, to calculate how much you have received in total.
- Date: The date you received the money, to track your income over periods of time.
- Categories: Any number of categories, to help you group related incomes together.
4.4.1 Add Income: add-income
Adds an income to the finance tracker.
After executing this command, the UI will automatically switch to the Incomes tab.
Format: add-income t/TITLE a/AMOUNT d/DATE [c/CATEGORY...]
-
DATEis optional; ifDATEis not given, the current date is used. -
CATEGORYis optional. Multiplec/prefixes can be used to specify multiple categories.
Shortcuts: addi; (when on the Incomes tab) add
Examples:
add-income t/Waitressing a/80 c/Workaddi t/Angpao money a/$20 d/25/01/2020 c/CNY c/Gift
Example Usage:
add-income t/Shopee Internship a/560 d/03/10/2020 c/Work
Expected Outcome:
New income added: Shopee Internship Amount: $560.00 Date: 03/10/2020 Categories: [Work]
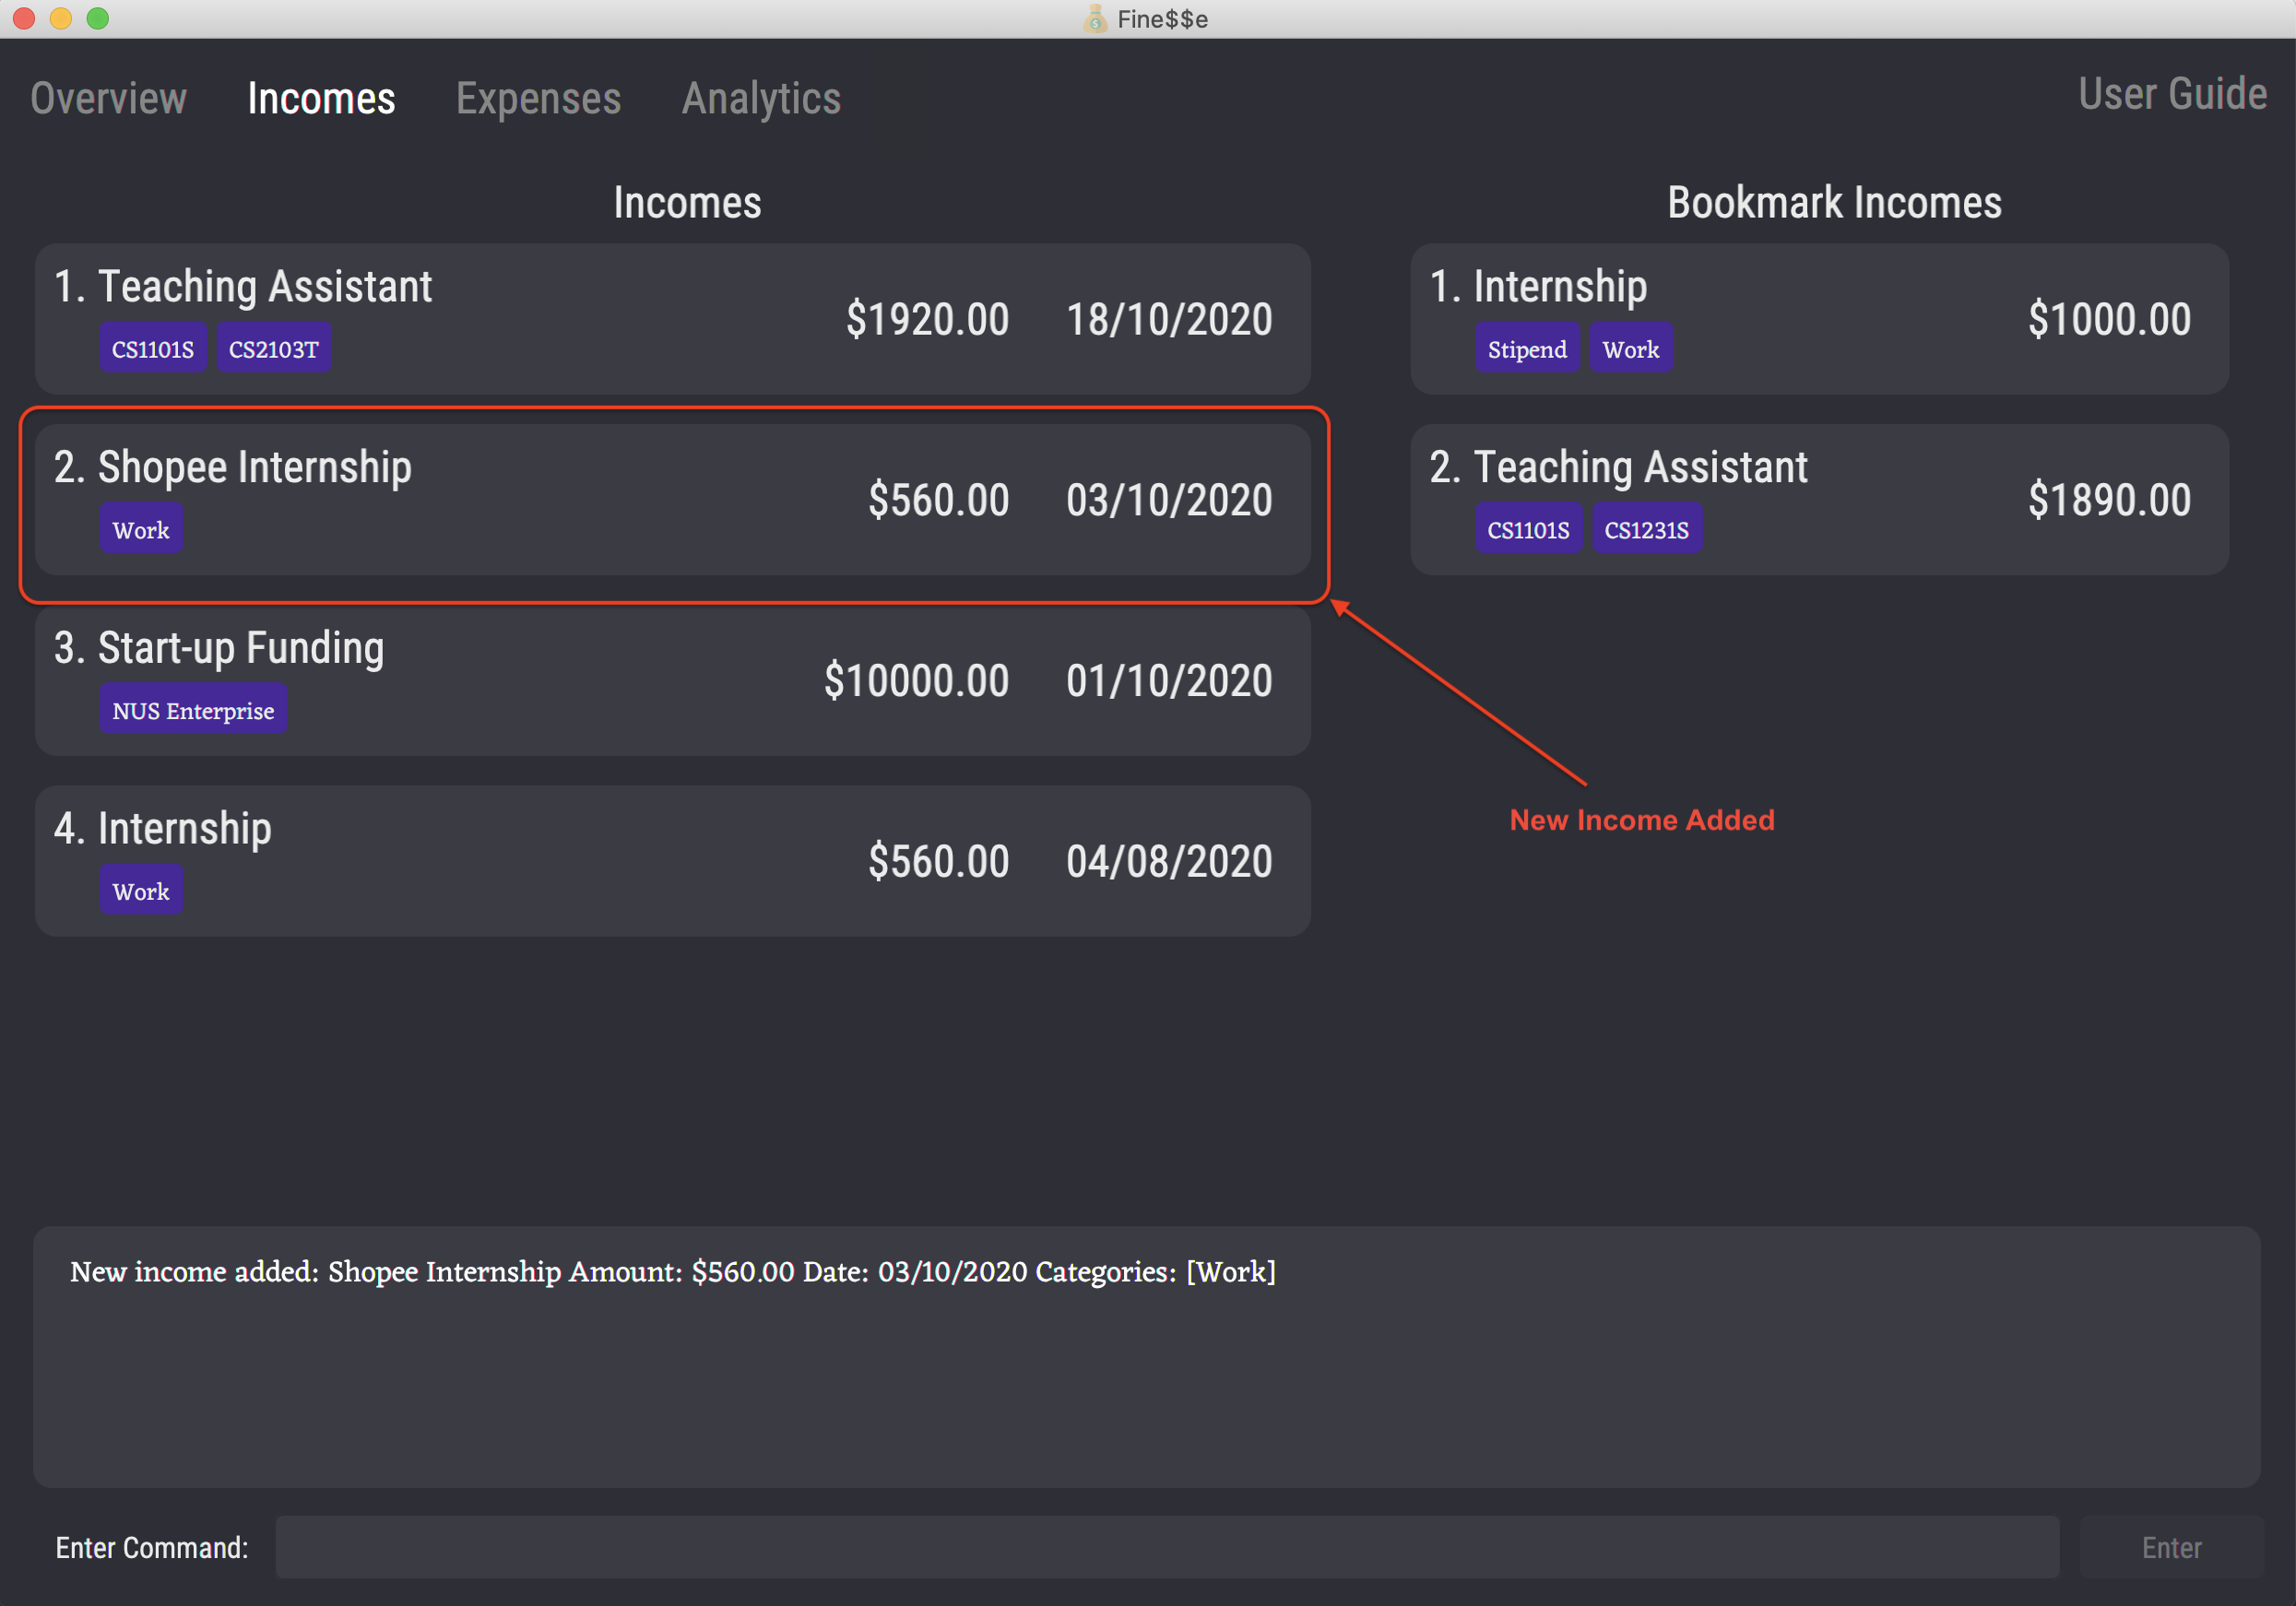
Adds a new income titled Shopee Internship, with amount $560.00, date 03/10/2020, and a single category Work.
4.4.2 Edit Income: edit
Edits an expense in the finance tracker.
Format: (when on the Incomes tab) edit INDEX [t/TITLE] [a/AMOUNT] [d/DATE] [c/CATEGORY...]
-
INDEXallows you to choose which income to edit by specifying its position in the currently displayed incomes list. -
TITLE,AMOUNT,DATEandCATEGORYallow you to specify the updated income information.
None of them are mandatory, but at least one must be specified.
If anyCATEGORYis specified, it will replace all of the income’s existing categories.
For parameters that have been omitted, the value will remain unchanged.
To remove all categories from an income, simply use
c/with no category name following it.
Examples:
edit 2 t/October Allowance c/Allowanceedit 1 a/5 d/22/09/2020
Example Usage:
edit 3 a/$2000 c/
Expected Outcome:
Edited Income: Start-up Funding Amount: $2000.00 Date: 01/10/2020 Categories:
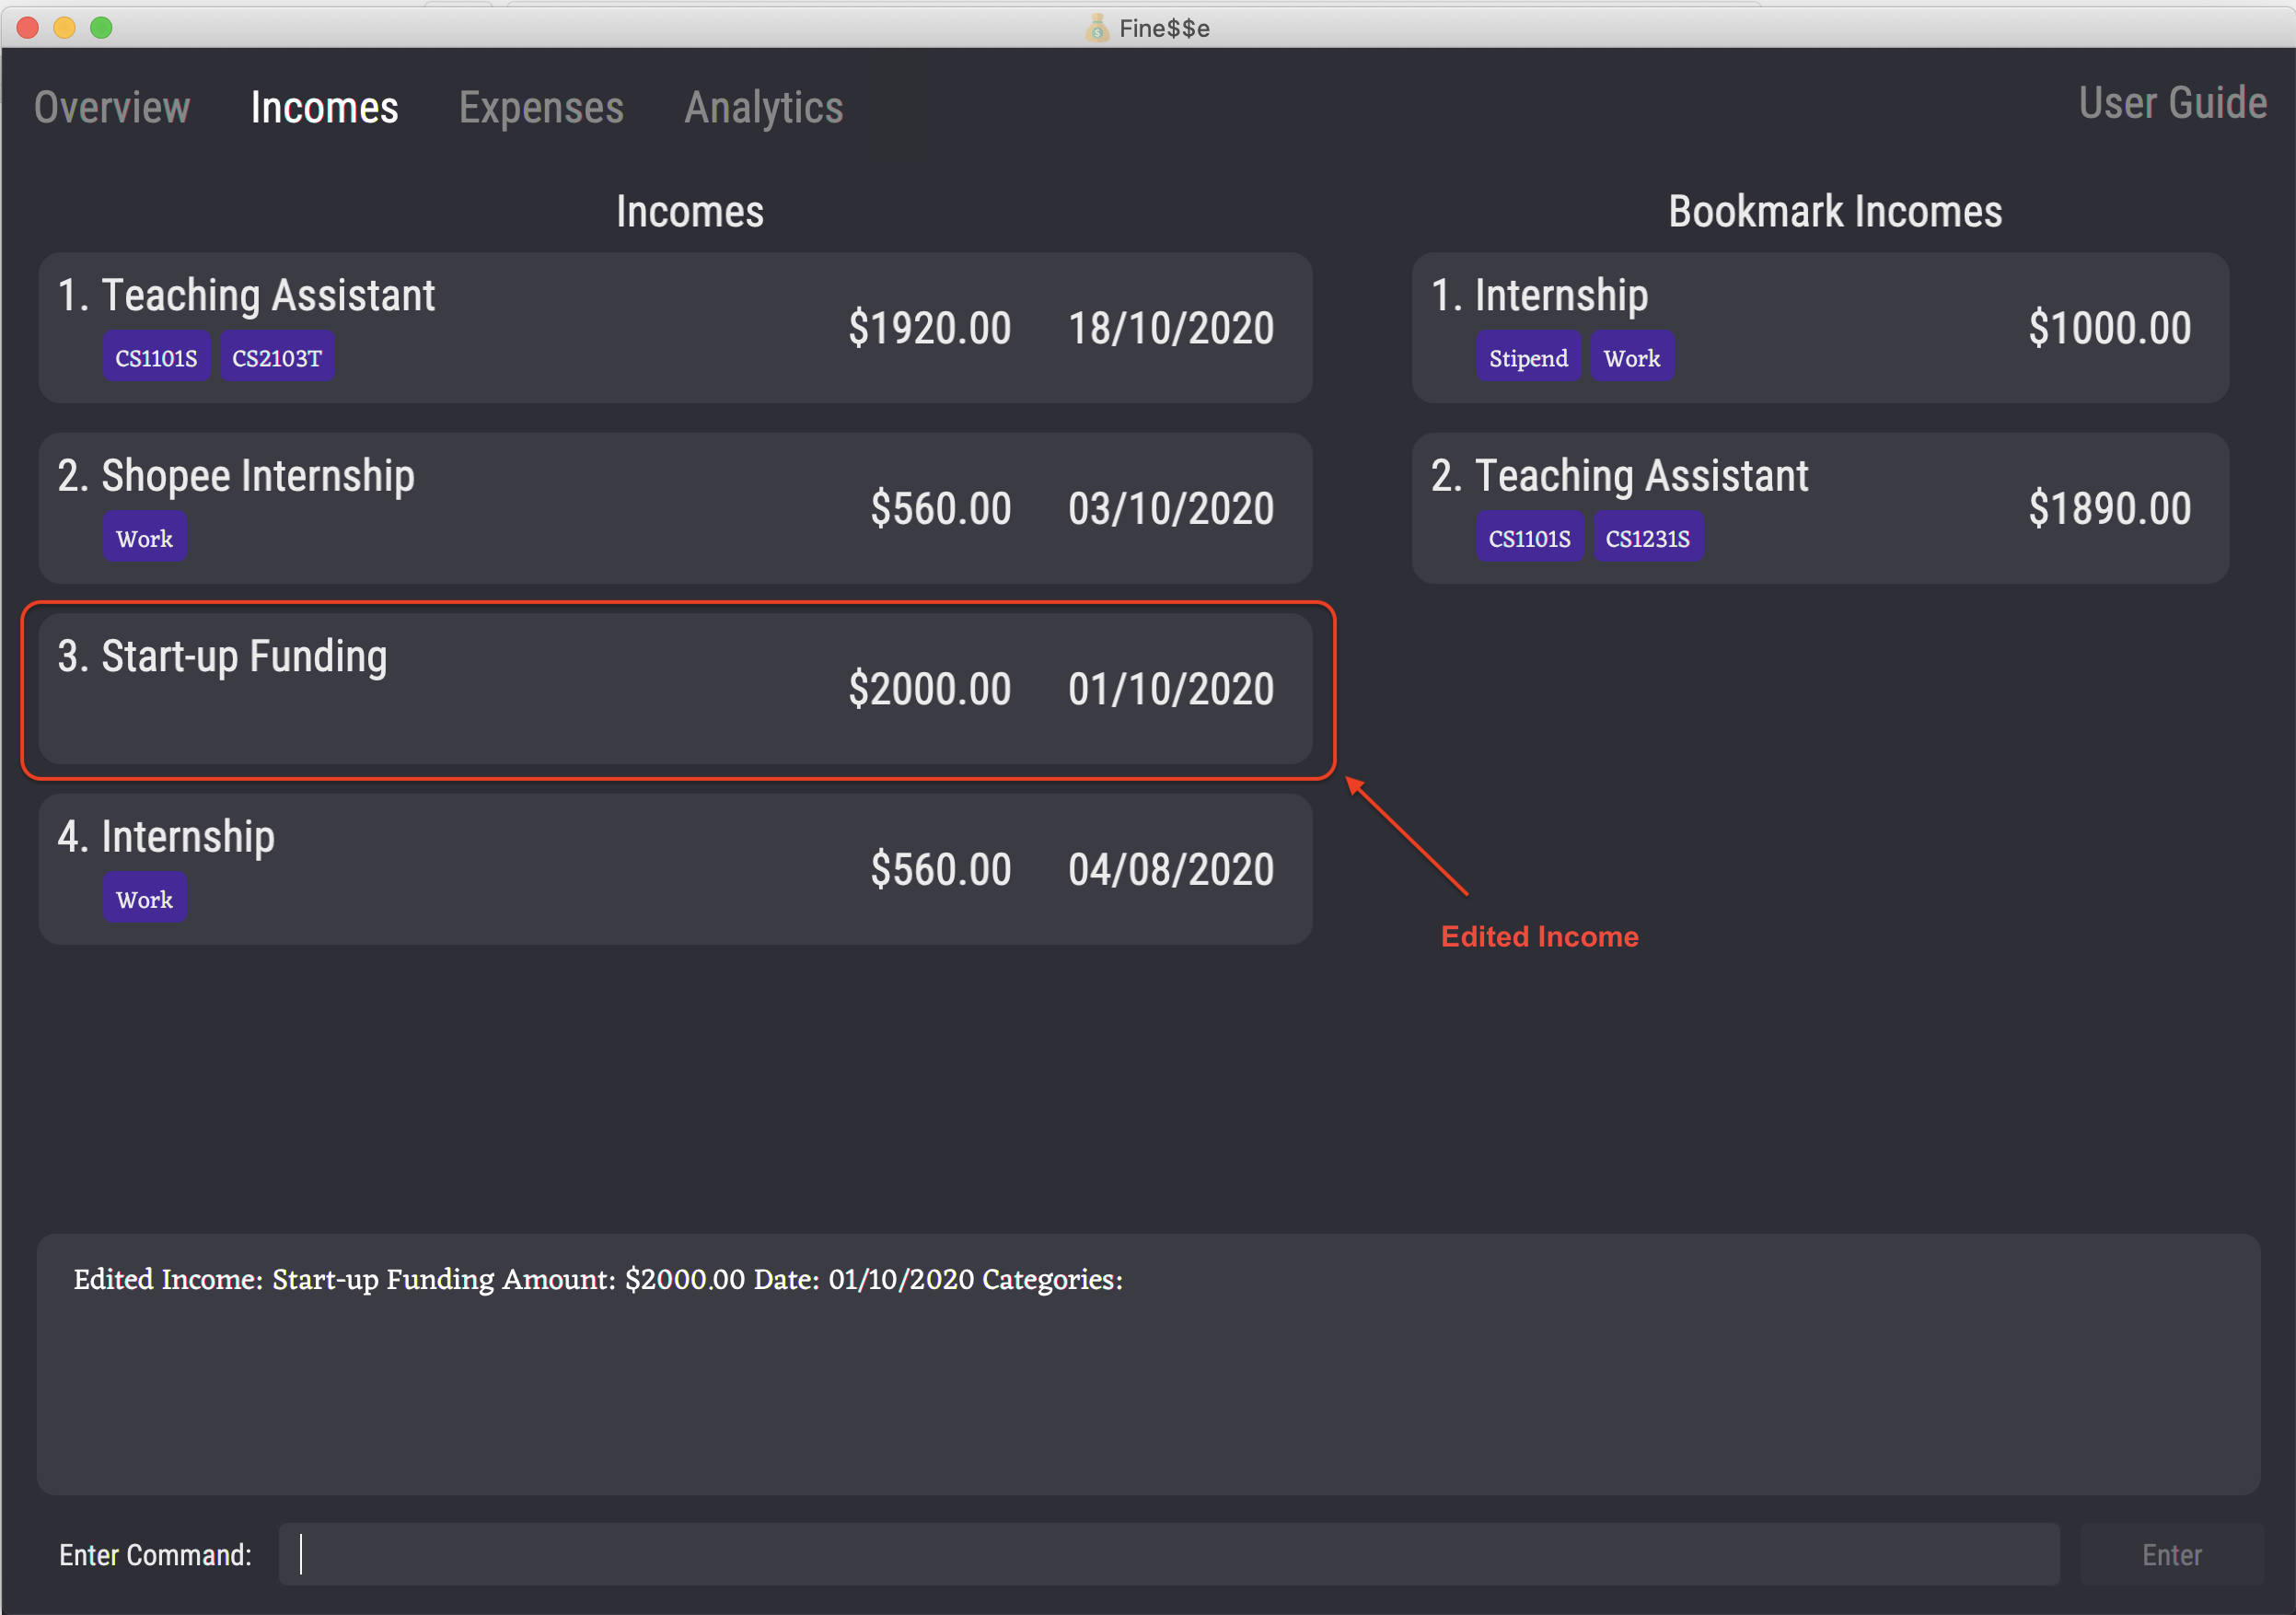
Edits the third income in the currently displayed incomes list to have amount $2000.00 and no categories.
The rest of the income information remains unchanged.
After executing this command, any filtering done on the incomes list via the
findcommand will be reset, and the incomes list will display all incomes.
4.4.3 Delete Income: delete
Deletes the specified income from the finance tracker.
Format: (when on the Incomes tab) delete INDEX
-
INDEXallows you to choose which income to delete by specifying its position in the currently displayed incomes list.
Example:
delete 3
Example Usage:
delete 1
Expected Outcome:
Deleted Income: Teaching Assistant Amount: $1920.00 Date: 18/10/2020 Categories: [CS2103T][CS1101S]
Deletes the second income in the currently displayed incomes list.
4.4.4 List Income: ls-income
Shows a list of all the incomes in the finance tracker.
This effectively resets any current filtering of the incomes list, such as those made by find.
After executing this command, the UI will automatically switch to the Incomes tab.
Format: ls-income
Shortcuts: lsi; (when on the Incomes tab) list
When on the Overview tab, you can use
listto list all transactions.
Example Usage:
list
Expected Outcome:
Listed all incomes.
Lists all incomes in the finance tracker.
4.4.5 Find Income: find
Finds incomes that match any of the given search parameters, and displays the list of matching incomes.
Format: (when on the Incomes tab) find [t/TITLE_KEYPHRASE...] [a/AMOUNT] [d/DATE] [c/CATEGORY...] [af/AMOUNT_FROM] [at/AMOUNT_TO] [df/DATE_FROM] [dt/DATE_TO]
When on the Overview tab, you can use
findto search for all transactions (expenses and incomes).
The available search parameters and their uses are as follows:
-
t/TITLE_KEYPHRASE: Searches for all incomes with titles containing the specifiedTITLE_KEYPHRASEkeyphrase.- The search is case-insensitive. e.g
t/workwill matchWork. - A keyphrase can contain more than one word. e.g.
t/Shopee internshipis considered as one keyphrase. - The order of the keyphrases does not matter. e.g.
t/TA t/part-timewill matchpart-time TA. - Partial matches are accepted. e.g.
t/internwill matchinternship. - Titles matching at least one keyphrase will be returned (i.e.
ORsearch). e.g.t/allowance t/prizewill returnLaptop Allowance,Hackathon Prize.
- The search is case-insensitive. e.g
-
a/AMOUNT: Searches for all incomes with the specified amount. -
d/DATE: Searches for all incomes that occurred on the specified date. -
c/CATEGORY: Searches for all incomes labelled with the specified category.- The search is case-insensitive. e.g
workwill matchWork. - More than one category can be given; the search will return incomes with any of the input categories.
- The search is case-insensitive. e.g
-
af/AMOUNT_FROM: Searches for all incomes with amounts more than or equal to the specified amount. -
at/AMOUNT_TO: Searches for all incomes with amounts less than or equal to the specified amount. -
df/DATE_FROM: Searches for all incomes that occurred on or later than the specified date. -
dt/DATE_TO: Searches for all incomes that occurred on or before the specified date.
None of the search parameters are mandatory, but at least one must be specified.
Examples:
find t/allowance d/01/10/2020find c/angpao at/20
Example Usage:
find c/prize c/gift af/10 at/100
Expected Outcome:
2 transactions listed!
Lists all incomes with the category prize and/or gift, with amounts between $10.00 and $100.00 inclusive.
4.5 Bookmark Expense
A bookmark expense is a template that allows you to create expenses that you make frequently, such as paying phone bills monthly or buying bubble tea weekly. You can convert a bookmark expense repeatedly to create as many expenses as you want, and the created expenses will automatically be added to Fine$$e’s expenses list.
To help you manage your finances, Fine$$e records the following information about each of your bookmark expenses:
- Title: A descriptive title, to remind you what the bookmark expense is about.
- Amount: How much money you will spend each time you convert the bookmark expense into an expense.
- Categories: Any number of categories, to help you group related incomes together.
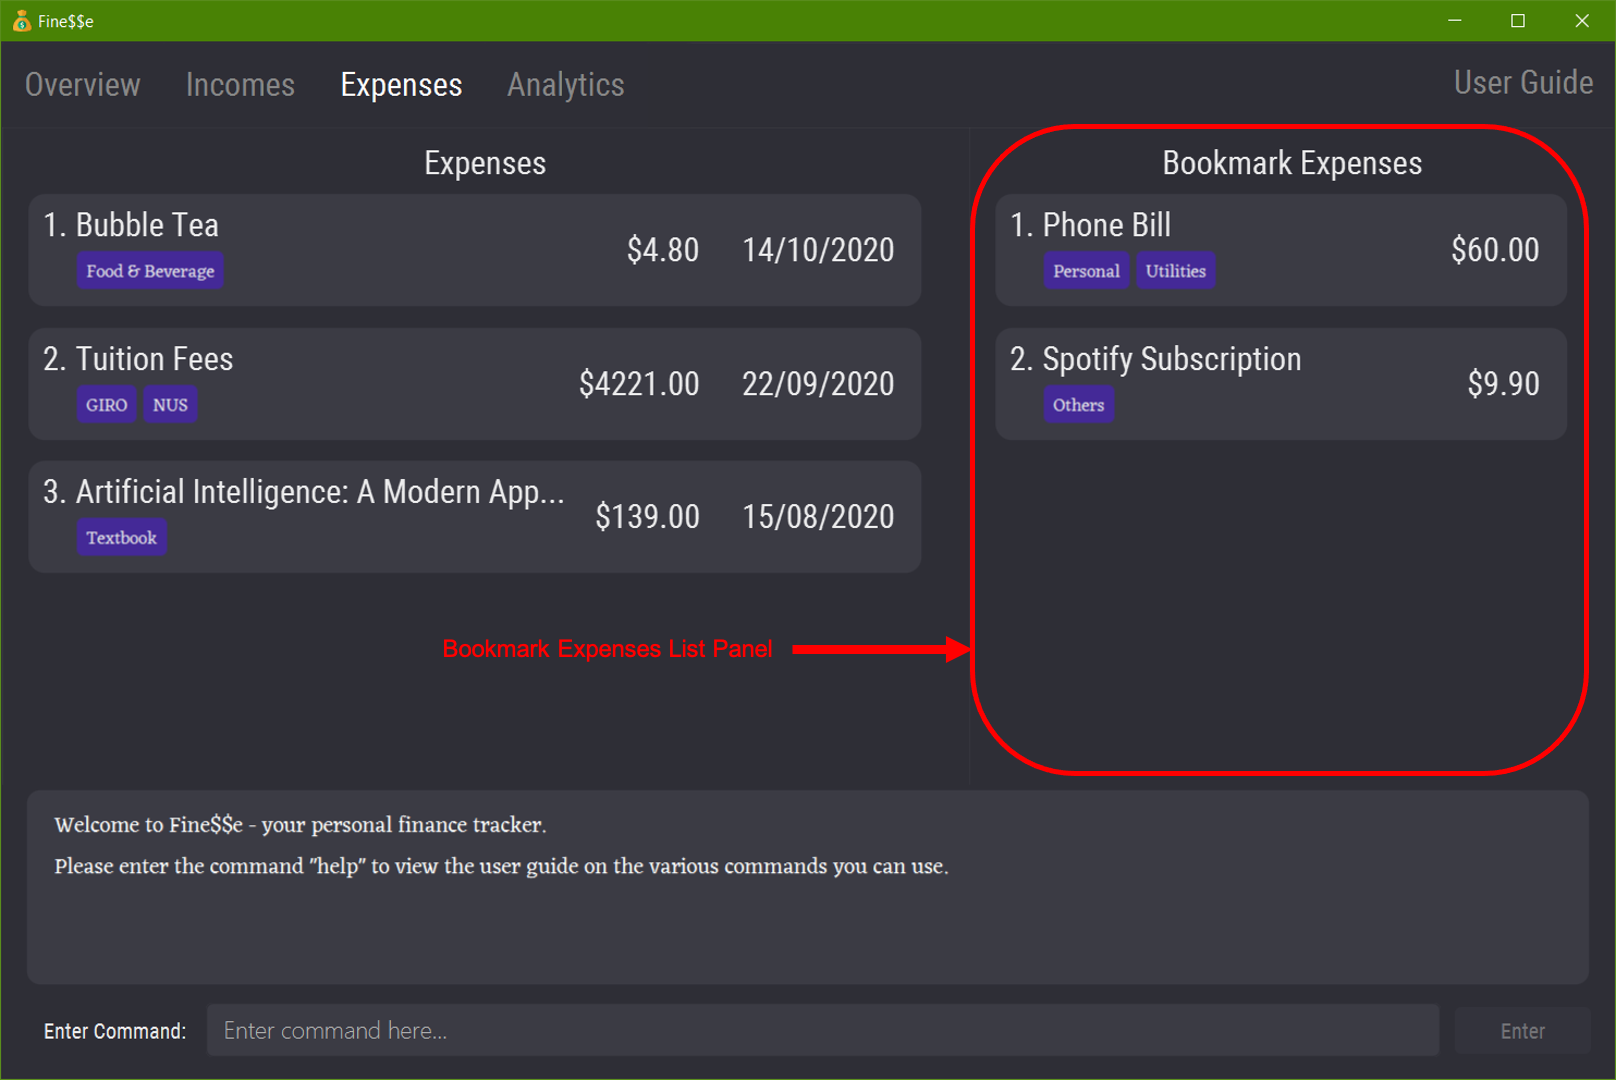
Bookmark Expenses List Panel in the Expenses Tab
4.5.1 Add Bookmark Expense: add-bookmark-expense
Adds a bookmark expense to the finance tracker.
After executing this command, the UI will automatically switch to the Expenses tab.
Format: add-bookmark-expense t/TITLE a/AMOUNT [c/CATEGORY...]
Shortcut: addbe t/TITLE a/AMOUNT [c/CATEGORY...]
-
CATEGORYis optional. Multiplec/prefixes can be used to specify multiple categories.
Adding of duplicate bookmark expenses is not allowed.
Bookmark expenses with the same titles are considered to be duplicates of each other.
Contiguous whitespace characters between words in the title will be treated as a single whitespace character.
e.g.Phone BillandPhone Billare considered to be the same title, whilePhone BillandPhoneBillare not considered to be the same title.
Examples:
add-bookmark-expense t/Phone Bill a/60 c/Utilities c/Personaladd-bookmark-expense t/Spotify Subscription a/$9 c/Othersaddbe t/Bubble Tea a/$4.50 c/Food & Beverageaddbe t/Lunch a/$5.00
Example Usage:
add-bookmark-expense t/Netflix Subscription a/11.98 c/Entertainment
Expected Outcome:
New bookmark expense added: Netflix Subscription Amount: $11.98 Categories: [Entertainment]

Adds a bookmark expense titled Netflix Subscription with amount $11.98 and one category Entertainment.
4.5.2 Edit Bookmark Expense: edit-bookmark
Edits a bookmark expense in the finance tracker.
This command can only be executed on the Expenses tab.
Bookmark expenses with the same titles are considered to be duplicates of each other.
Therefore, editing the title of a bookmark expense to an already existing title in the bookmark expenses list is not allowed.
Contiguous whitespace characters between words in the title will be treated as a single whitespace character.
Format: edit-bookmark INDEX [t/TITLE] [a/AMOUNT] [c/CATEGORY...]
-
INDEXallows you to choose which bookmark expense to edit by specifying its position in the bookmark expenses list. -
TITLE,AMOUNTandCATEGORYallow you to specify the updated bookmark expense information.
None of them are mandatory, but at least one must be specified.
If anyCAEGORYis specified, it will replace all of the bookmark expense’s existing categories.
For parameters that have been omitted, the value will remain unchanged.
To remove all categories from a bookmark expense, simply use
c/with no category name following it.
Examples:
edit-bookmark 1 a/65edit-bookmark 2 t/Part Time a/400 c/Workedit-bookmark 3 c/Others
Example Usage:
edit-bookmark 3 a/15 c/Entertainment c/Personal
Expected Outcome:
Edited Bookmark Expense: Netflix Subscription Amount: $15.00 Categories: [Entertainment][Personal]
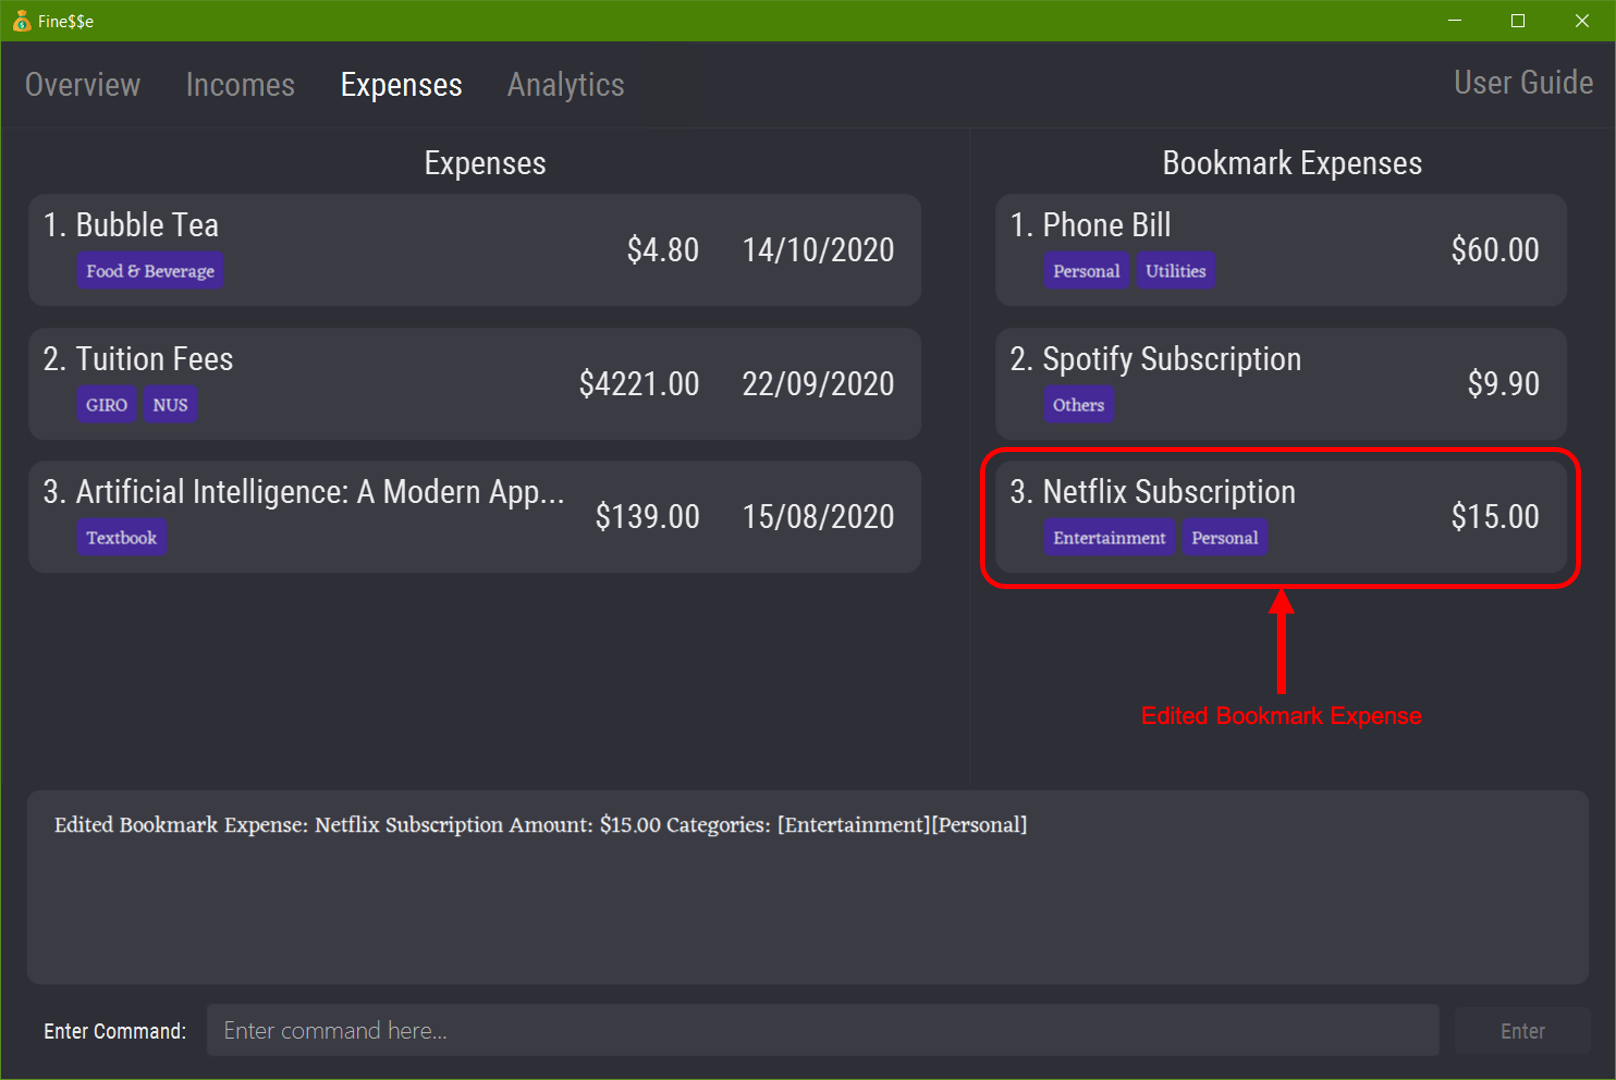
Edits the third bookmark expense in the bookmark expenses list to have an amount of $15.00 and two categories Entertainment and Personal.
4.5.3 Delete Bookmark Expense: delete-bookmark
Deletes the specified bookmark expense from the finance tracker.
This command can only be executed on the Expenses tab.
Format: delete-bookmark INDEX
-
INDEXallows you to choose which bookmark expense to delete by specifying its position in the bookmark expenses list.
Example:
delete-bookmark 2
Example Usage:
delete-bookmark 3
Expected Outcome:
Deleted Bookmark Expense: Phone Bill Amount: $60.00 Categories: [Utilities]
Deletes the third bookmark expense in the bookmark expenses list.
4.5.4 Convert Bookmark Expense: convert-bookmark
Converts a bookmark expense into an expense, and adds it to the expenses list.
This command can only be executed on the Expense tab.
Format: convert-bookmark INDEX [d/DATE]
Shortcut: convertb INDEX [d/DATE]
-
INDEXallows you to choose which bookmark expense to convert by specifying its position in the bookmark expenses list. -
DATEis optional; ifDATEis not specified, the current date is used.
Examples:
convert-bookmark 2 d/10/10/2020convertb 1 d/05/05/2020
Example Usage:
convert-bookmark 3 d/10/08/2020
Expected Outcome:
Bookmark expense has been converted and successfully added to finance tracker: Netflix Subscription Amount: $15.00 Date: 10/08/2020 Categories: [Entertainment][Personal]
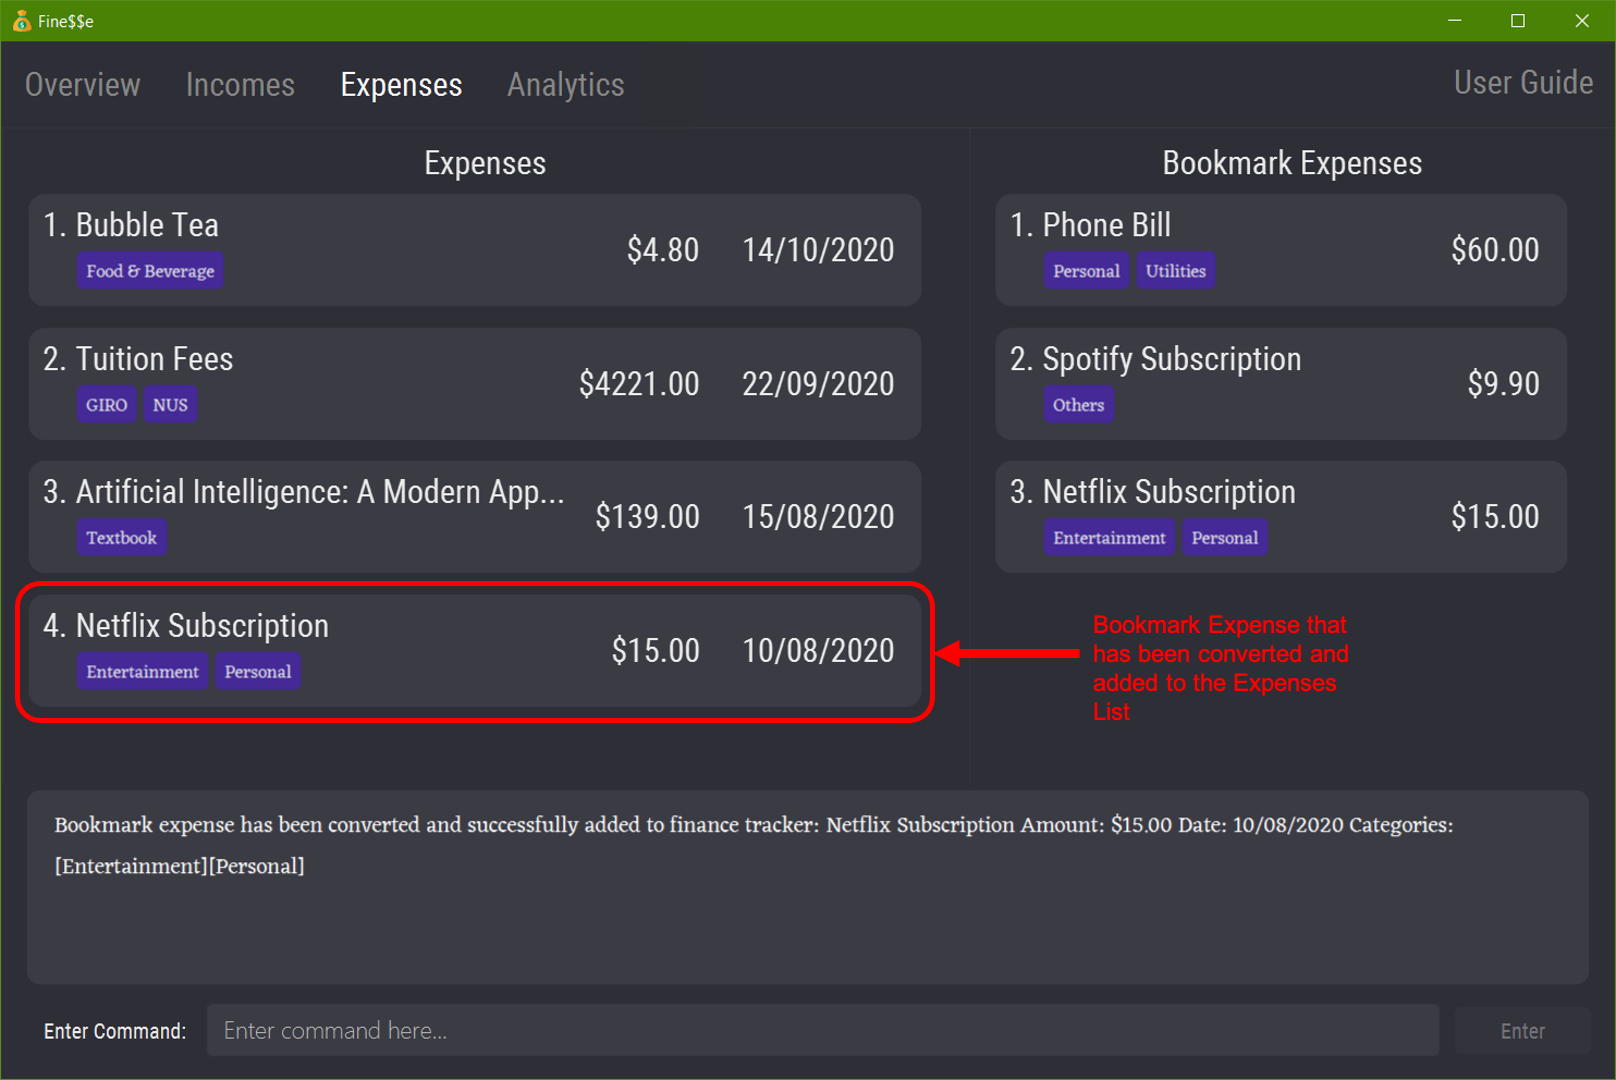
Converts the third bookmark expense in the bookmark expenses list into an expense with the information of the
specified bookmark expense and date 10/08/2020, and adds it to the expenses list in the finance tracker.
4.6 Bookmark Income
A bookmark income is a template that allows you to create incomes that you make frequently, such as monthly salary or stipend for being a teaching assistant. You can convert a bookmark income repeatedly to create as many incomes as you want, and the created incomes will automatically be added to Fine$$e’s incomes list.
To help you manage your finances, Fine$$e records the following information about each of your bookmark incomes:
- Title: A descriptive title, to remind you what the bookmark income is about.
- Amount: How much money you will receive each time you convert the bookmark income into an income.
- Categories: Any number of categories, to help you group related incomes together.
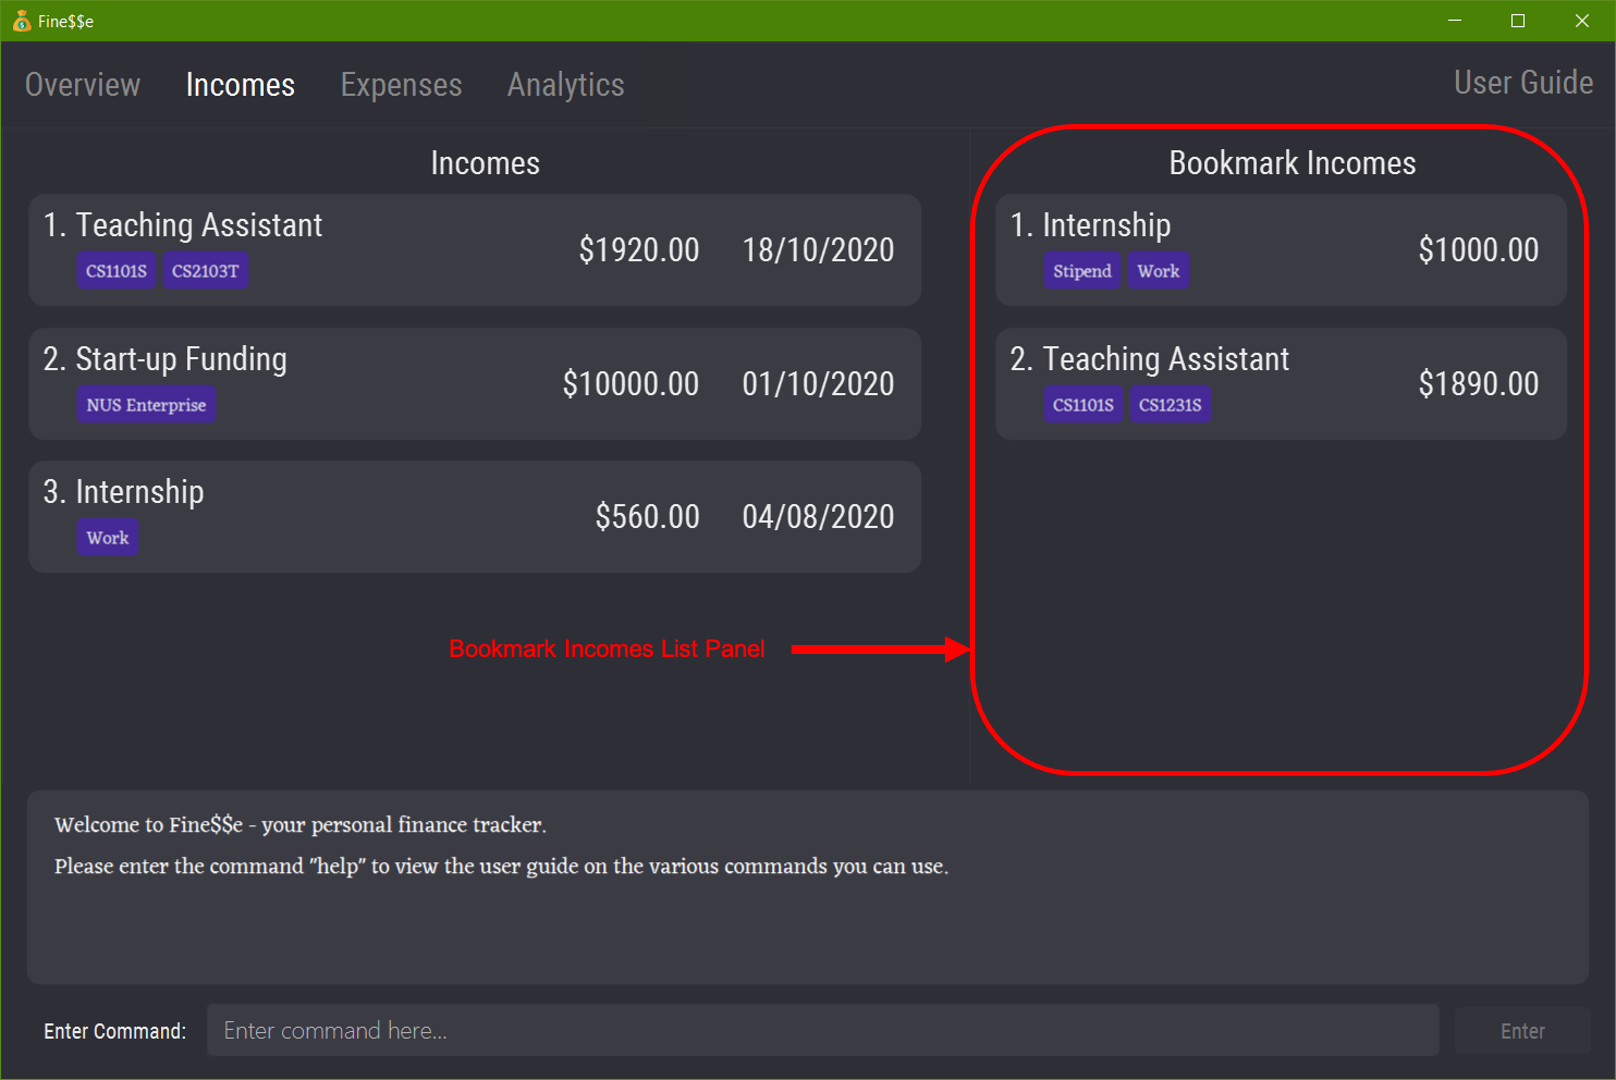
Bookmark Incomes List Panel in the Incomes Tab
4.6.1 Add Bookmark Income: add-bookmark-income
Adds a bookmark income to the finance tracker.
After executing this command, the UI will automatically switch to the Incomes tab.
Format: add-bookmark-income t/TITLE a/AMOUNT [c/CATEGORY...]
Shortcut: addbi t/TITLE a/AMOUNT [c/CATEGORY...]
-
CATEGORYis optional. Multiplec/prefixes can be used to specify multiple categories.
Adding of duplicate bookmark incomes is not allowed.
Bookmark incomes with the same titles are considered to be duplicates of each other.
Contiguous whitespace characters between words in the title will be treated as a single whitespace character.
e.g.Part TimeandPart Timeare considered to be the same title, whilePart TimeandPartTimeare not considered to be the same title.
Examples:
add-bookmark-income t/Internship a/$1000 c/Workadd-bookmark-income t/Part Time a/450 c/Work c/Startupaddbi t/Investments a/400 c/Personal c/Dividendsaddbi t/Monthly Allowance a/300
Example Usage:
add-bookmark-income t/Part Time a/400 c/Work
Expected Outcome:
New bookmark income added: Part Time Amount: $400.00 Categories: [Work]

Adds a bookmark income titled Part Time with amount $400.00 and one category Work.
4.6.2 Edit Bookmark Income: edit-bookmark
Edits a bookmark income in the finance tracker.
This command can only be executed on the Incomes tab.
Bookmark incomes with the same titles are considered to be duplicates of each other.
Therefore, editing the title of a bookmark income to an already existing title in the bookmark incomes list is not allowed.
Contiguous whitespace characters between words in the title will be treated as a single whitespace character.
Format: edit-bookmark INDEX [t/TITLE] [a/AMOUNT] [c/CATEGORY...]
-
INDEXallows you to choose which bookmark income to edit by specifying its position in the bookmark incomes list. -
TITLE,AMOUNTandCATEGORYallow you to specify the updated bookmark income information.
None of them are mandatory, but at least one must be specified.
If anyCATEGORYis specified, it will replace all of the bookmark income’s existing categories.
For parameters that have been omitted, the value will remain unchanged.
To remove all categories from a bookmark income, simply use
c/with no category name following it.
Examples:
edit-bookmark 1 t/Monthly Tuition c/Work c/Part Timeedit-bookmark 2 a/1200edit-bookmark 3 t/Investments a/$300.00
Example Usage:
edit-bookmark 3 a/500 c/Work c/Part Time Intern
Expected Outcome:
Edited Bookmark Income: Part Time Amount: $500.00 Categories: [Work][Part Time Intern]
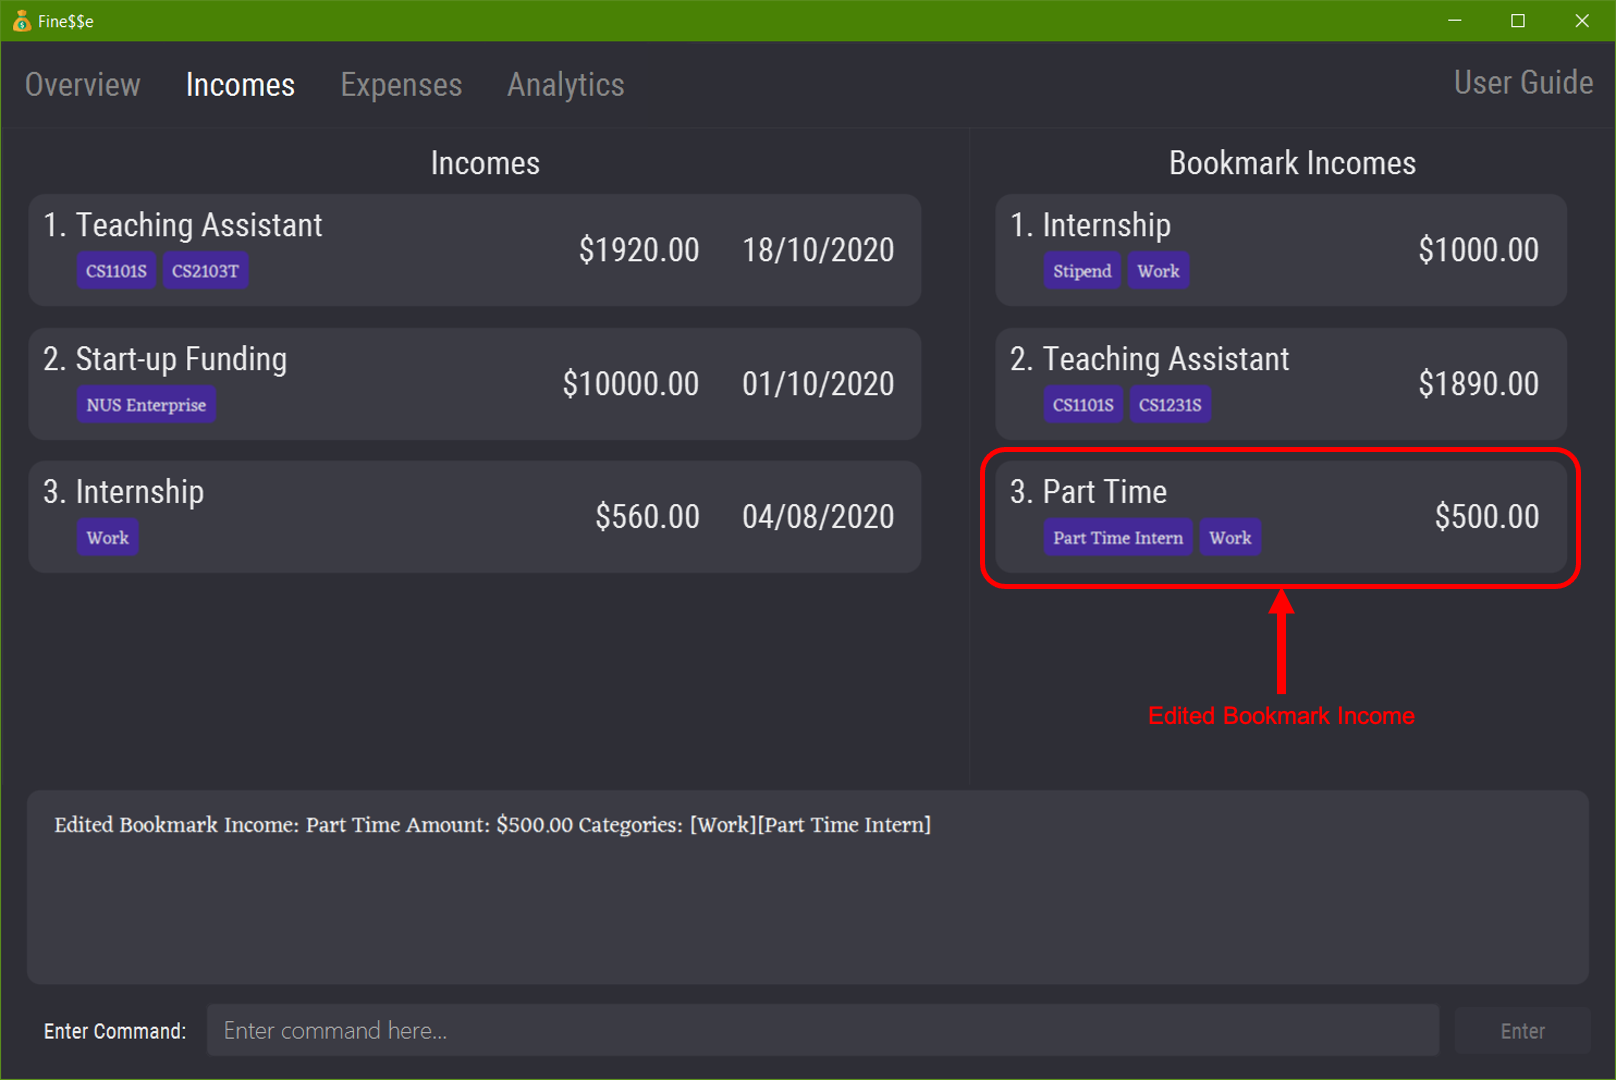
Edits the third bookmark income in the bookmark incomes list to have an amount of $500.00 and two categories Work and Part Time Intern.
4.6.3 Delete Bookmark Income: delete-bookmark
Deletes the bookmark income and all of its information from the bookmark income list in Fine$$e.
This command can only be executed on the Incomes tab.
Format: delete-bookmark INDEX
-
INDEXallows you to choose which bookmark income to delete by specifying its position in the bookmark incomes list.
Example:
delete-bookmark 1
Example Usage:
delete-bookmark 2
Expected Outcome:
Deleted Bookmark Income: Teaching Assistant Amount: $1890.00 Categories: [CS1101S][CS1231S]
Deletes the second bookmark expense in the bookmark incomes list.
4.6.4 Convert Bookmark Income: convert-bookmark
Converts a bookmark income into an income, and adds it to the incomes list.
This command can only be executed on the Incomes tab.
Format: convert-bookmark INDEX [d/DATE]
Shortcut: convertb INDEX [d/DATE]
-
INDEXrefers to the index number of the bookmark income shown in the bookmark incomes list. -
DATEis optional; ifDATEis not specified, the current date is used.
Examples:
convert-bookmark 1 d/10/10/2020convertb 2 d/15/10/2020
Example Usage:
convert-bookmark 3 d/03/08/2020
Expected Outcome:
Bookmark income has been converted and successfully added to finance tracker: Part Time Amount: $500.00 Date: 03/08/2020 Categories: [Work][Part Time Intern]
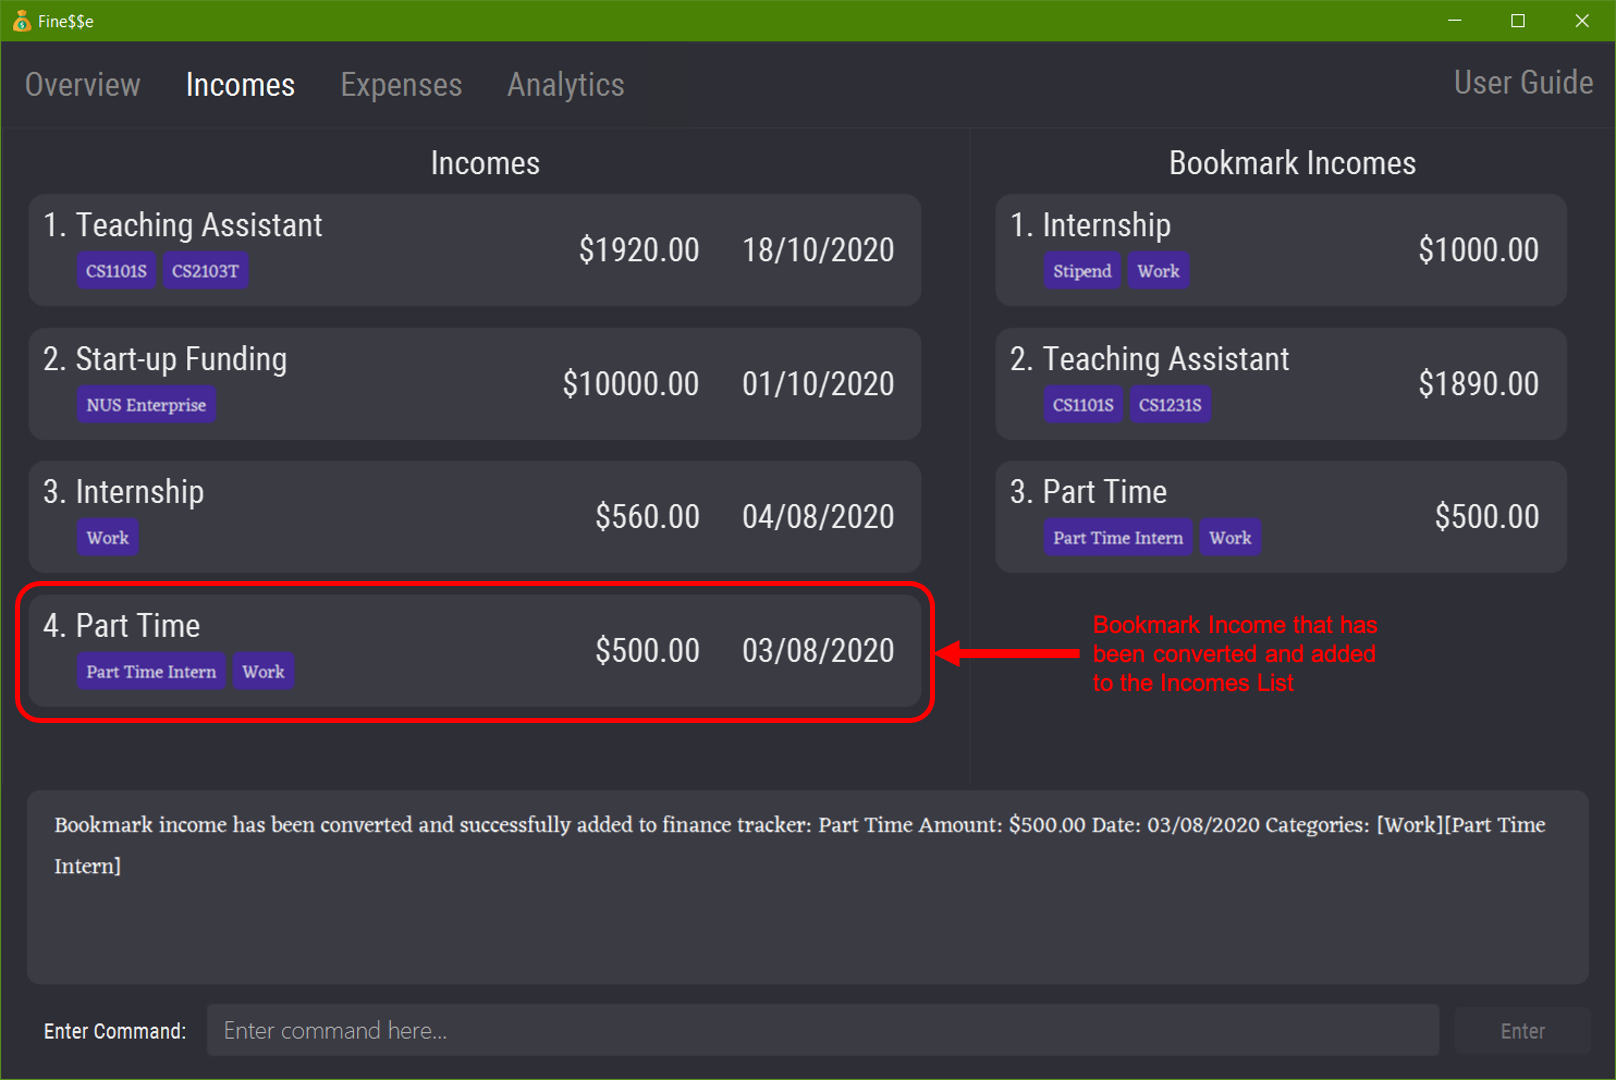
Converts the third bookmark income in the bookmark incomes list into an income with the information of the
specified bookmark income and date 03/08/2020, then adds it to the incomes list in the finance tracker.
4.7 Expense Limit
Ever feel like your wallet just won’t stop bleeding? Try setting a monthly expense limit! The expense limit feature allows you to limit your spending by setting a budget for the month. The monthly expense limit is visible on the Overview tab along with your remaining budget for this month, which is automatically calculated based on the expenses in the finance tracker.
4.7.1 Set Expense Limit: set-expense-limit
Sets the monthly expense limit in the finance tracker.
After executing this command, the UI will automatically switch to the Overview tab.
Format: set-expense-limit a/AMOUNT
Shortcut: setel a/AMOUNT
Example:
set-expense-limit a/500
Example Usage:
setel a/$400.00
Expected Outcome:
New monthly expense limit set: $400.00
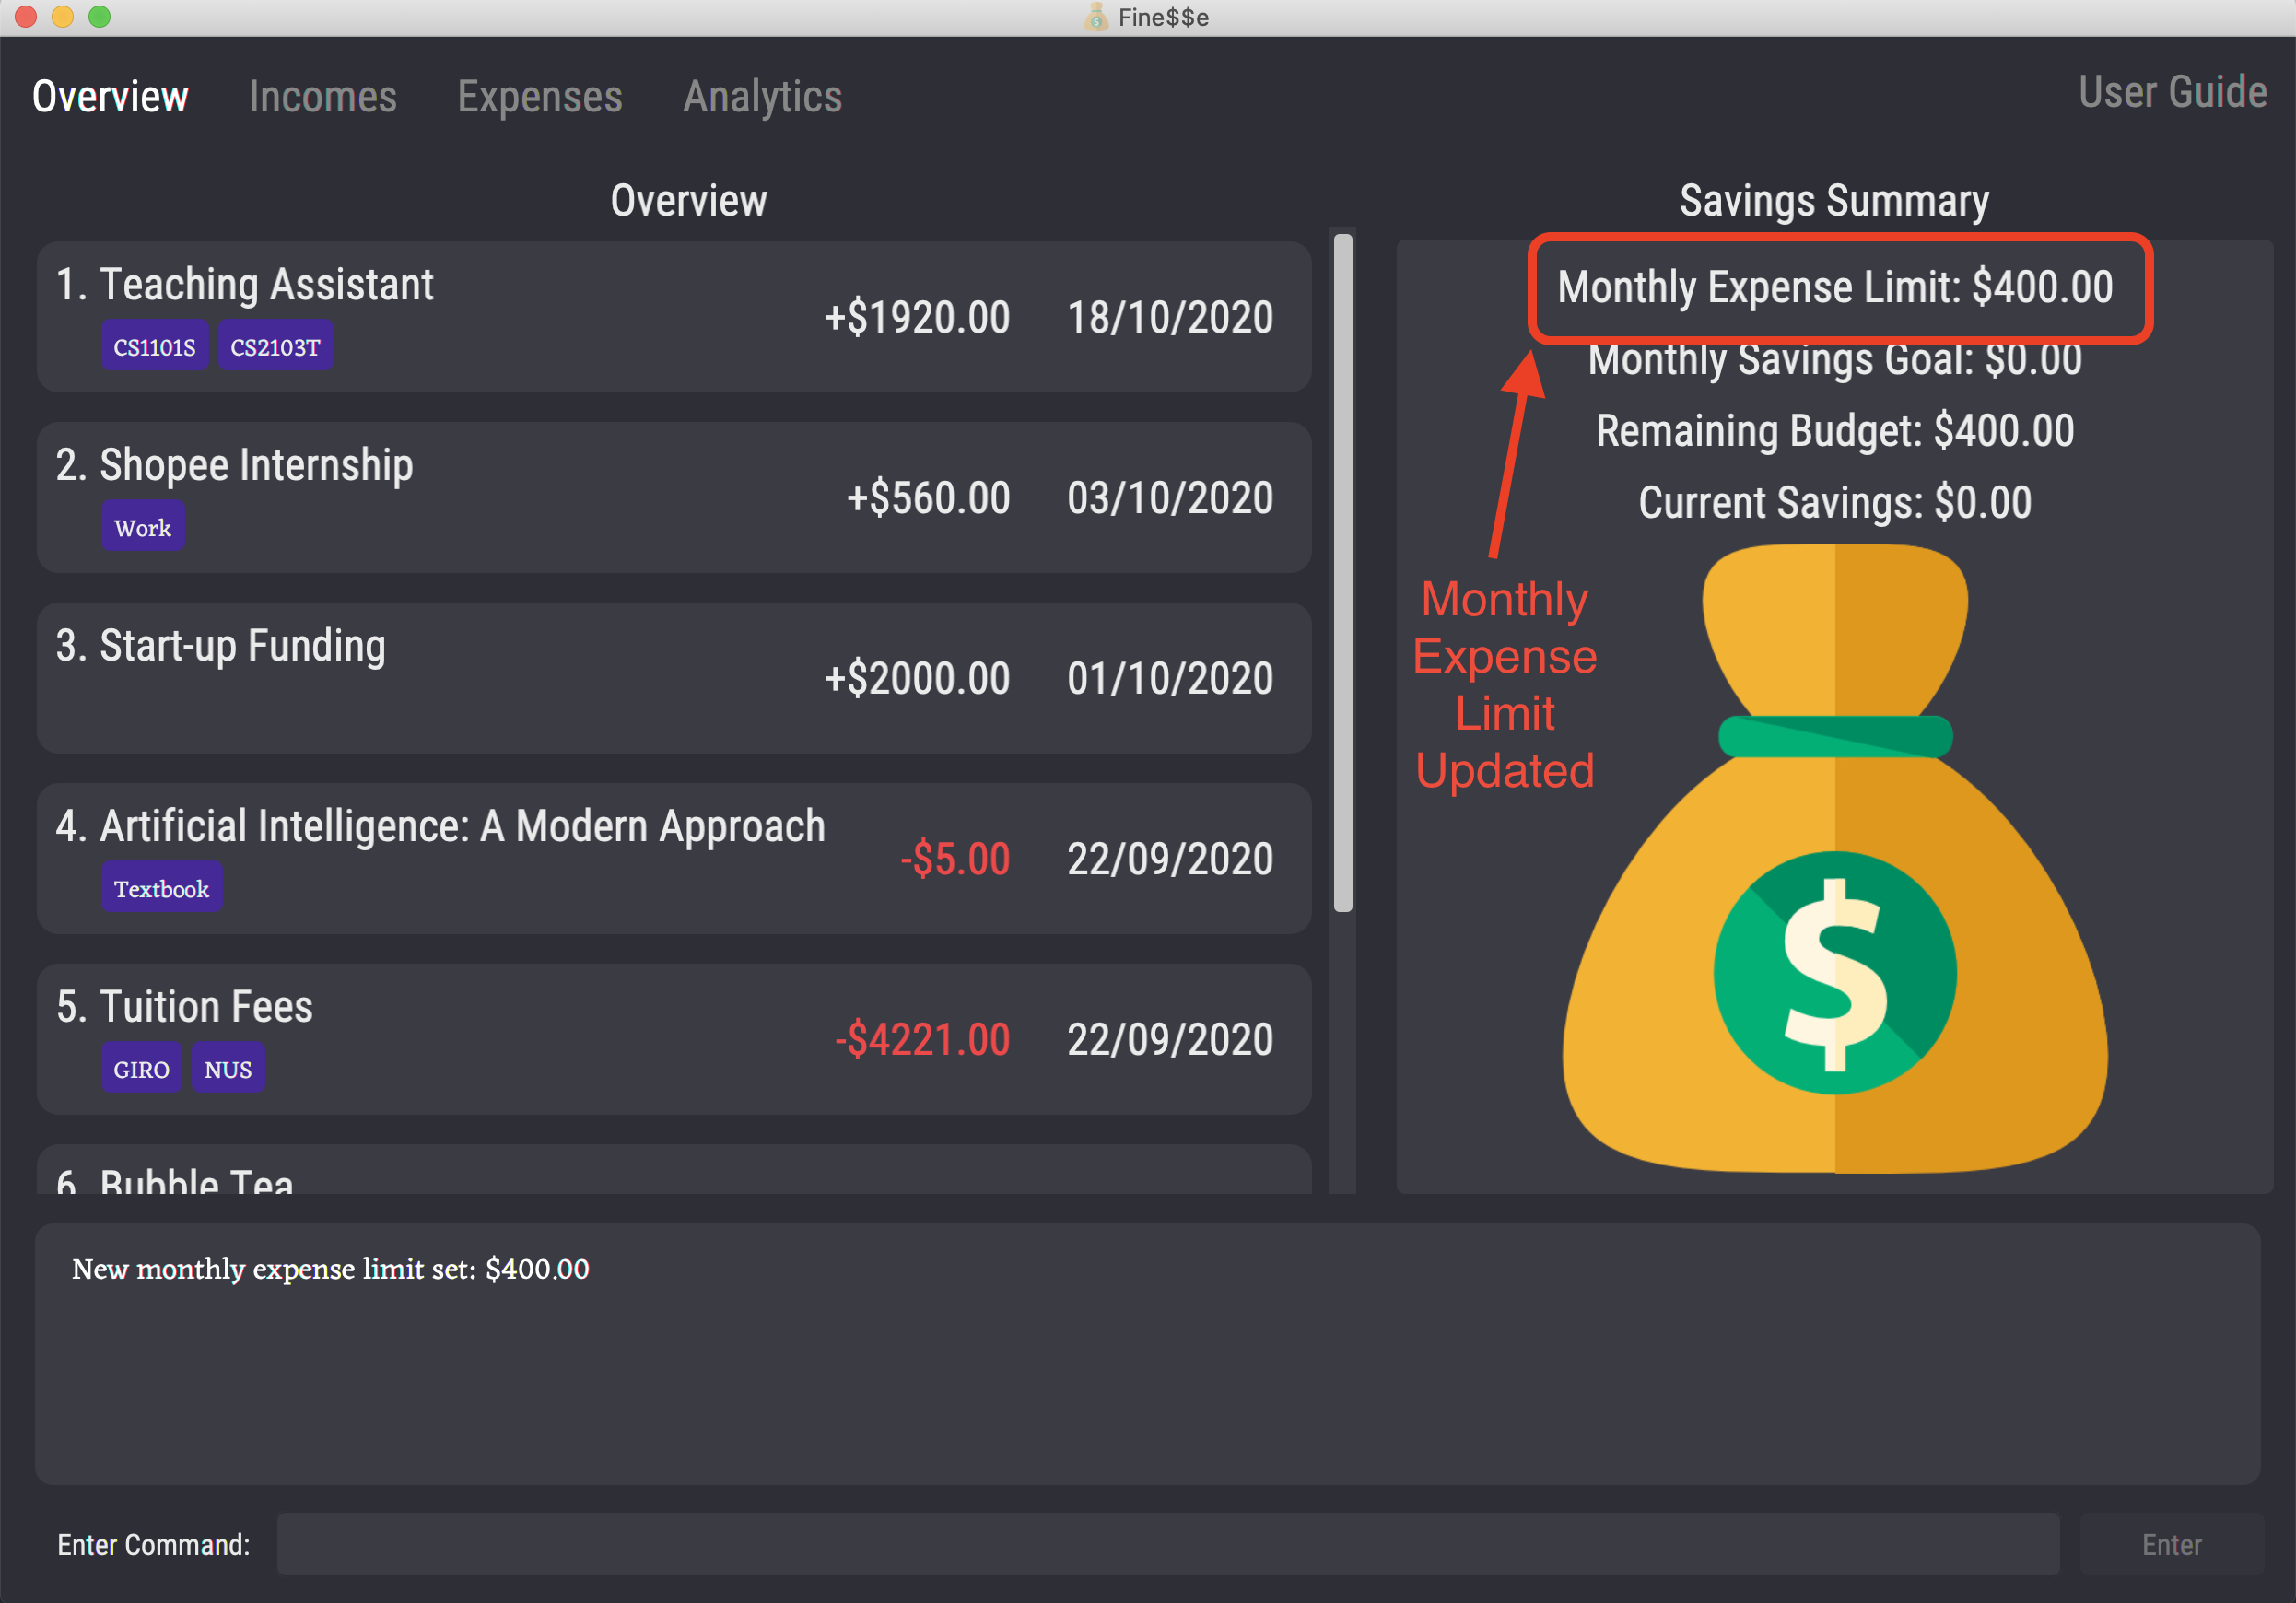
Sets the monthly expense limit in the finance tracker to be $400.00.
4.8 Savings Goal
Want to save up for the new PlayStation 5 but can’t seem to no matter what? Fine$$e has you covered! The savings goal feature allows you to save consistently by setting a monthly savings goal, so that you can save up bit by bit and build good financial habits. The monthly savings goal visible on the Overview tab along with your current savings for this month, which is automatically calculated based on the expenses and incomes in the finance tracker.
4.8.1 Set Savings Goal: set-savings-goal
Sets the monthly savings goal in the finance tracker.
After executing this command, the UI will automatically switch to the Overview tab.
Format: set-savings-goal a/AMOUNT
Shortcut: setsg a/AMOUNT
Example:
set-savings-goal a/100
Example Usage:
setsg a/$50.00
Expected Outcome:
New monthly savings goal set: $50.00
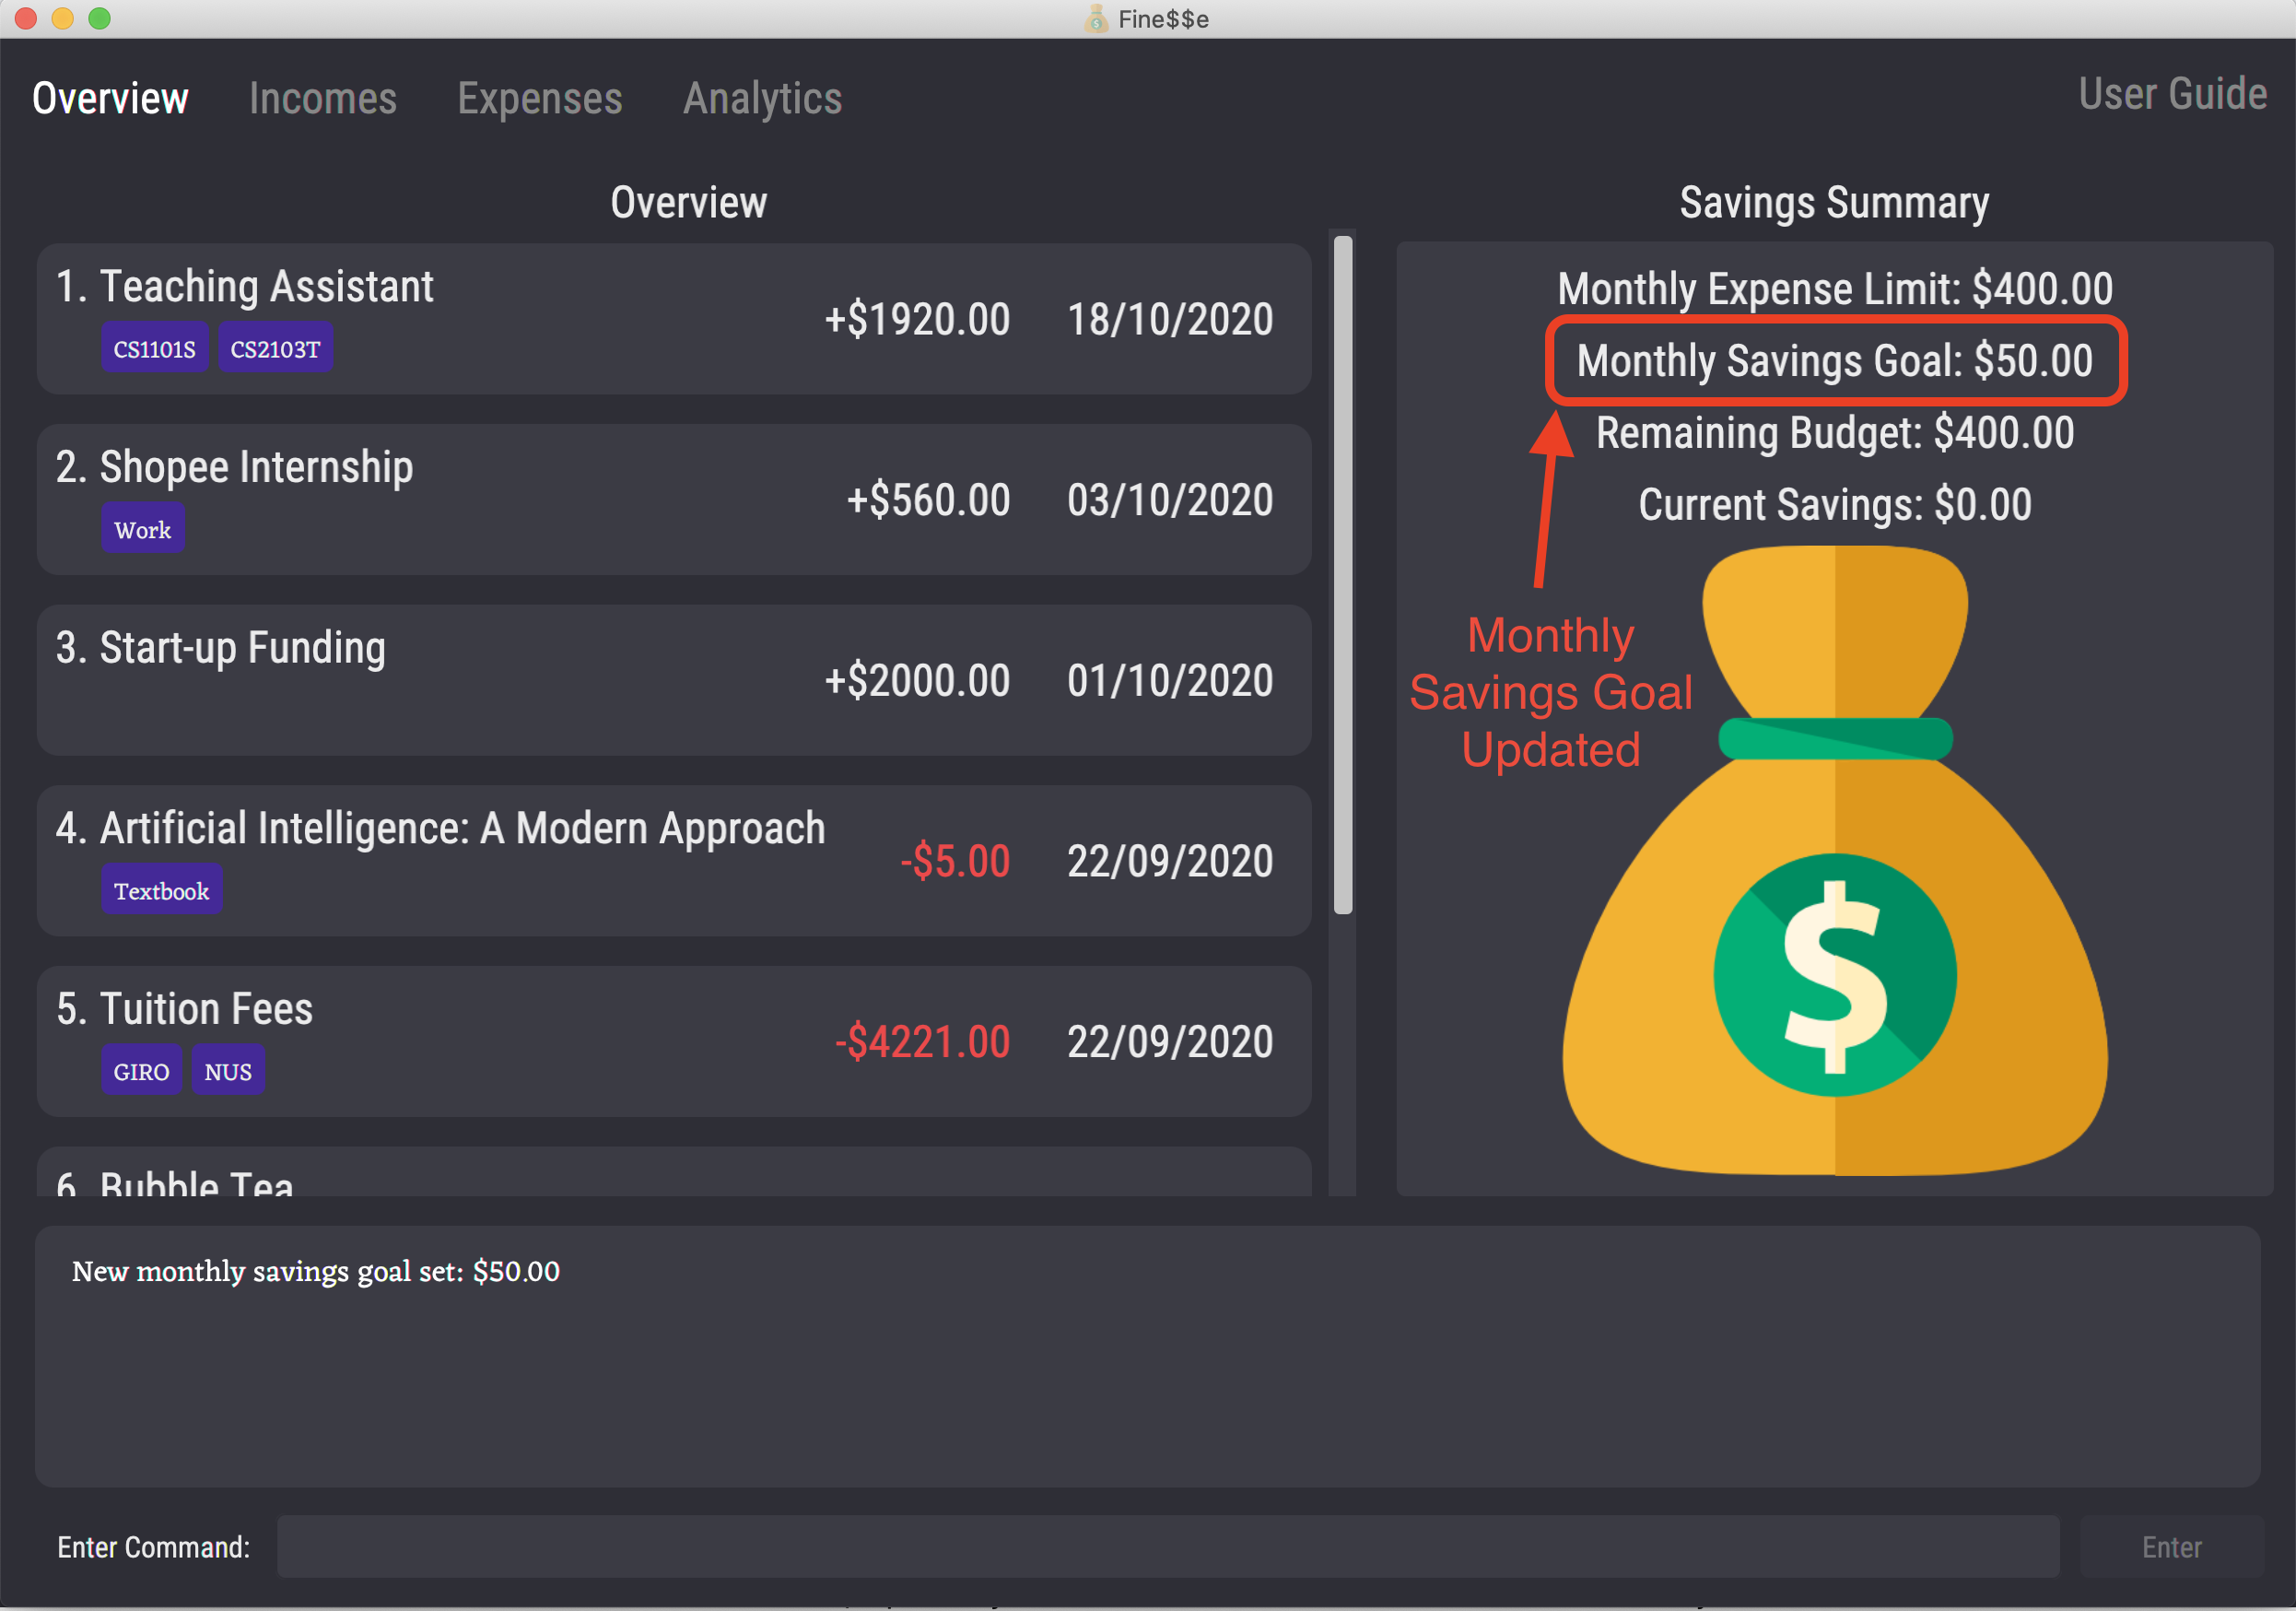
Sets the monthly savings goal in the finance tracker to be $50.00.
4.9 Analytics
Want to see your spending/saving trends? The Analytics feature will allow you to view a variety of trends based on the incomes/expenses you have entered into the finance tracker. These analytics will give you a better overview of your incomes/expenses and help you better understand them, so that you can make targeted changes to your habits if need be.
There are three bar charts that show the following data over the past three months:
- Total monthly expenses
- Total monthly incomes
- Total monthly savings
Whenever you switch to the Analytics tab, the data in the bar charts is automatically updated to include any recent modifications you have made in the finance tracker. This ensures that you will always see the latest information about your spending and saving trends.
4.10 Clear Data: clear
Ready to start using Fine\$\$e after fiddling with the sample data? Want to start over your finance tracking journey on a clean slate? This command allows you to clear all existing data inside the finance tracker. That includes:
- Expenses and incomes
- Bookmark expenses and bookmark incomes
- Monthly expense limit
- Monthly savings goal
Format: clear
This is a powerful command. You might lose your precious data if you are not careful with it.
If there is any data you would like to keep before clearing, save it somewhere so that you can re-enter it later.
To protect against accidental usage, this command needs to be entered twice in succession before it takes effect.
A single clear command is nullified when not followed by another clear command.
Here are some example scenarios to illustrate:
- Scenario A: Enter
clear.- The finance tracker data is unchanged.
- Fine\$\$e requests for a second
clearcommand as confirmation.
- Scenario B: Enter
clear, then enterclearagain.- The finance tracker data is cleared.
- Scenario C: Enter
clear, then enterlsi(a valid command), then enterclearagain.- The finance tracker data is unchanged.
- The first
clearcommand has been nullified, so Fine\$\$e requests for a secondclearcommand as confirmation.
- Scenario D: Enter
clear, then enterfoo(an invalid command), then enterclearagain.- The finance tracker data is unchanged.
- The first
clearcommand has been nullified, so Fine\$\$e requests for a secondclearcommand as confirmation.
- Scenario E: Enter
clear, then enterlsi, then enterclearagain, then enterclearagain.- The finance tracker data is cleared.
Example Usage:
clear
Expected Outcome:
Please enter 'clear' again to confirm your decision.
Example Usage (continued):
clear
Expected Outcome:
Finance tracker has been cleared!
All data in the finance tracker is cleared.
4.11 Exit the Program: exit
Exits the program.
Format: exit
4.12 Command History
Accidentally entered the wrong command and wish to modify it without typing it out again fully? Simply press the ↑ or ↓ arrow keys on your keyboard to navigate through your command history.
- The command history keeps track of the latest 50 commands entered in the current session.
- The command input box must be focused on, i.e. ensure that the text cursor is blinking in the command input box.
- Press the ↑ arrow key to retrieve the previous commands.
- Each press of the ↑ arrow key retrieves the command immediately preceding the current command.
- If the current command is the earliest command that is being tracked, then pressing the ↑ arrow key does nothing.
- Press the ↓ arrow key to retrieve the next commands.
- Each press of the ↓ arrow key retrieves the command immediately succeeding the current command.
- If the current command is the latest command that has been entered, then the command input box will be cleared upon pressing the ↓ arrow key.
Pressing either the ↑ or ↓ arrow keys will cause whatever text is currently in the command box to be overwritten.
4.13 Saving the Data
Fine$$e data is saved in the hard disk automatically after any command that changes the data. There is no need to save manually.
5. Command Summary
| Action | Format | Examples |
|---|---|---|
| Add Expense |
add-expense t/TITLE a/AMOUNT [d/DATE] [c/CATEGORY...] adde t/TITLE a/AMOUNT [d/DATE] [c/CATEGORY...] (On Expenses tab) add t/TITLE a/AMOUNT [d/DATE] [c/CATEGORY...]
|
add-expense t/Bubble Tea a/5 d/03/10/2020 c/Food & Beverage adde t/Taxi Home from School a/$13.50 d/10/10/2020 c/Transport c/School
|
| Add Income |
add-income t/TITLE a/AMOUNT [d/DATE] [c/CATEGORY...] addi t/TITLE a/AMOUNT [d/DATE] [c/CATEGORY...] (On Income tab) add t/TITLE a/AMOUNT [d/DATE] [c/CATEGORY...]
|
add-income t/Internship a/560 d/03/10/2020 c/Work addi t/Angpao money a/$20 d/10/10/2020 c/CNY c/Gift
|
| List Expenses |
ls-expense lse (On Expenses tab) list
|
|
| List Incomes |
ls-income lsi (On Incomes tab) list
|
|
| Find | find [t/TITLE_KEYPHRASE...] [a/AMOUNT] [d/DATE] [c/CATEGORY...] [af/AMOUNT_FROM] [at/AMOUNT_TO] [df/DATE_FROM] [dt/DATE_TO] |
find c/Food & drink af/10 find t/allowance d/01/10/2020
|
| Edit | edit INDEX [t/TITLE] [a/AMOUNT] [d/DATE] [c/CATEGORY...] |
edit 1 t/Brunch d/22/09/2020 edit 2 a/500 c/
|
| Delete | delete INDEX |
delete 1 |
| Add Bookmark Expense |
add-bookmark-expense t/TITLE a/AMOUNT [c/CATEGORY...] addbe t/TITLE a/AMOUNT [c/CATEGORY...]
|
add-bookmark-expense t/Phone Bill a/60 c/Utilities c/Personal addbe t/Bubble Tea a/$4.50 c/Food & Beverage
|
| Add Bookmark Income |
add-bookmark-income t/TITLE a/AMOUNT [c/CATEGORY...] addbi t/TITLE a/AMOUNT [c/CATEGORY...]
|
add-bookmark-income t/Internship a/$1000 c/Work addbi t/Investments a/400 c/Personal c/Dividends
|
| Edit Bookmark | edit-bookmark INDEX [t/TITLE] [a/AMOUNT] [c/CATEGORY...] |
edit-bookmark 1 t/Monthly Tuition c/Work c/Part Time edit-bookmark 2 a/1200
|
| Delete Bookmark | delete-bookmark INDEX |
delete-bookmark 2 |
| Convert Bookmark |
convert-bookmark INDEX [d/DATE] convertb INDEX [d/DATE]
|
convert-bookmark 2 d/10/10/2020 convertb 1 d/05/05/2020
|
| Set Expense Limit |
set-expense-limit a/AMOUNT setel a/AMOUNT
|
set-expense-limit a/500 setel a/$400.00
|
| Set Savings Goal |
set-savings-goal a/AMOUNT setsg a/AMOUNT
|
set-savings-goal a/100 setsg a/$50.00
|
| Tab | tab INDEX |
tab 2 |
| Help | help |
|
| Exit | exit |
6. Glossary
| Term | Definition |
|---|---|
| Bookmark Expense | A template for an expense, which can be used to create expenses that are added to the finance tracker. |
| Bookmark Income | A template for an income, which can be used to create incomes that are added to the finance tracker. |
| Current Date | The system date on the computer on which Fine$$e is set up. |
| Expense | A one-time transaction that results in a decrease in the amount of money you have. |
| Income | A one-time transaction that results in an increase in the amount of money you have. |
| Text Cursor | A blinking vertical line that indicates where text will be placed when entered. |
7. FAQ
Q: How do I transfer my data to another computer?
A: Install the app on the other computer and overwrite the empty data file it creates with the file that contains the data of your previous Fine$$e finance tracker in the home folder.